Recipes

Pineapple Chicken Fried Rice with Turkey Sausage Recipe - Cooking with Lilydale

Birthday celebrations are always worthy of cooking up a storm in the kitchen, and we have a very special birthday worth celebrating! I'm talking about Lilydale and they’re turning 75! If you haven't heard about Lilydale before they were established 75 years ago as an Alberta Farmers cooperative, and now Lilydale has become Canada's premier poultry provider. They are committed to providing Canadians with wholesome and delicious products that only use 100% Canadian raised chicken and turkey from local farmers. With its signature green logo, their various poultry products ranging from deli meats, breakfast sausages, turkey bacon, frozen boxed products, carved and fresh turkey and chicken can all be found at local grocery stores across Canada. If you are ever in need of some poultry to complete your breakfast, lunch, or dinner recipe Lilydale is what you need to get!

Now as I said earlier birthdays are always worth celebrating, and the best way I know how is to celebrate through the taste buds! I've been going through a Thai cuisine phase lately and I've been hitting up some of my favourite Thai restaurants in the city. One dish I keep on ordering at these restaurants is Pineapple Fried Rice. And of course when it comes from a Thai restaurant more than likely the fried rice is served in a pineapple bowl! Pure genius if you ask me! Presentation is fun and you let nothing go to waste. Even the pineapple shell is used and it really is a wow factor when served to all your guests at a party. The juiciness from the pineapples mixed into the fried rice is my absolute favourite part of the dish, delivering another level of flavour and acidity to each bite that you won't be able to find in just ordinary fried rice.

IMG_9141-01.jpeg

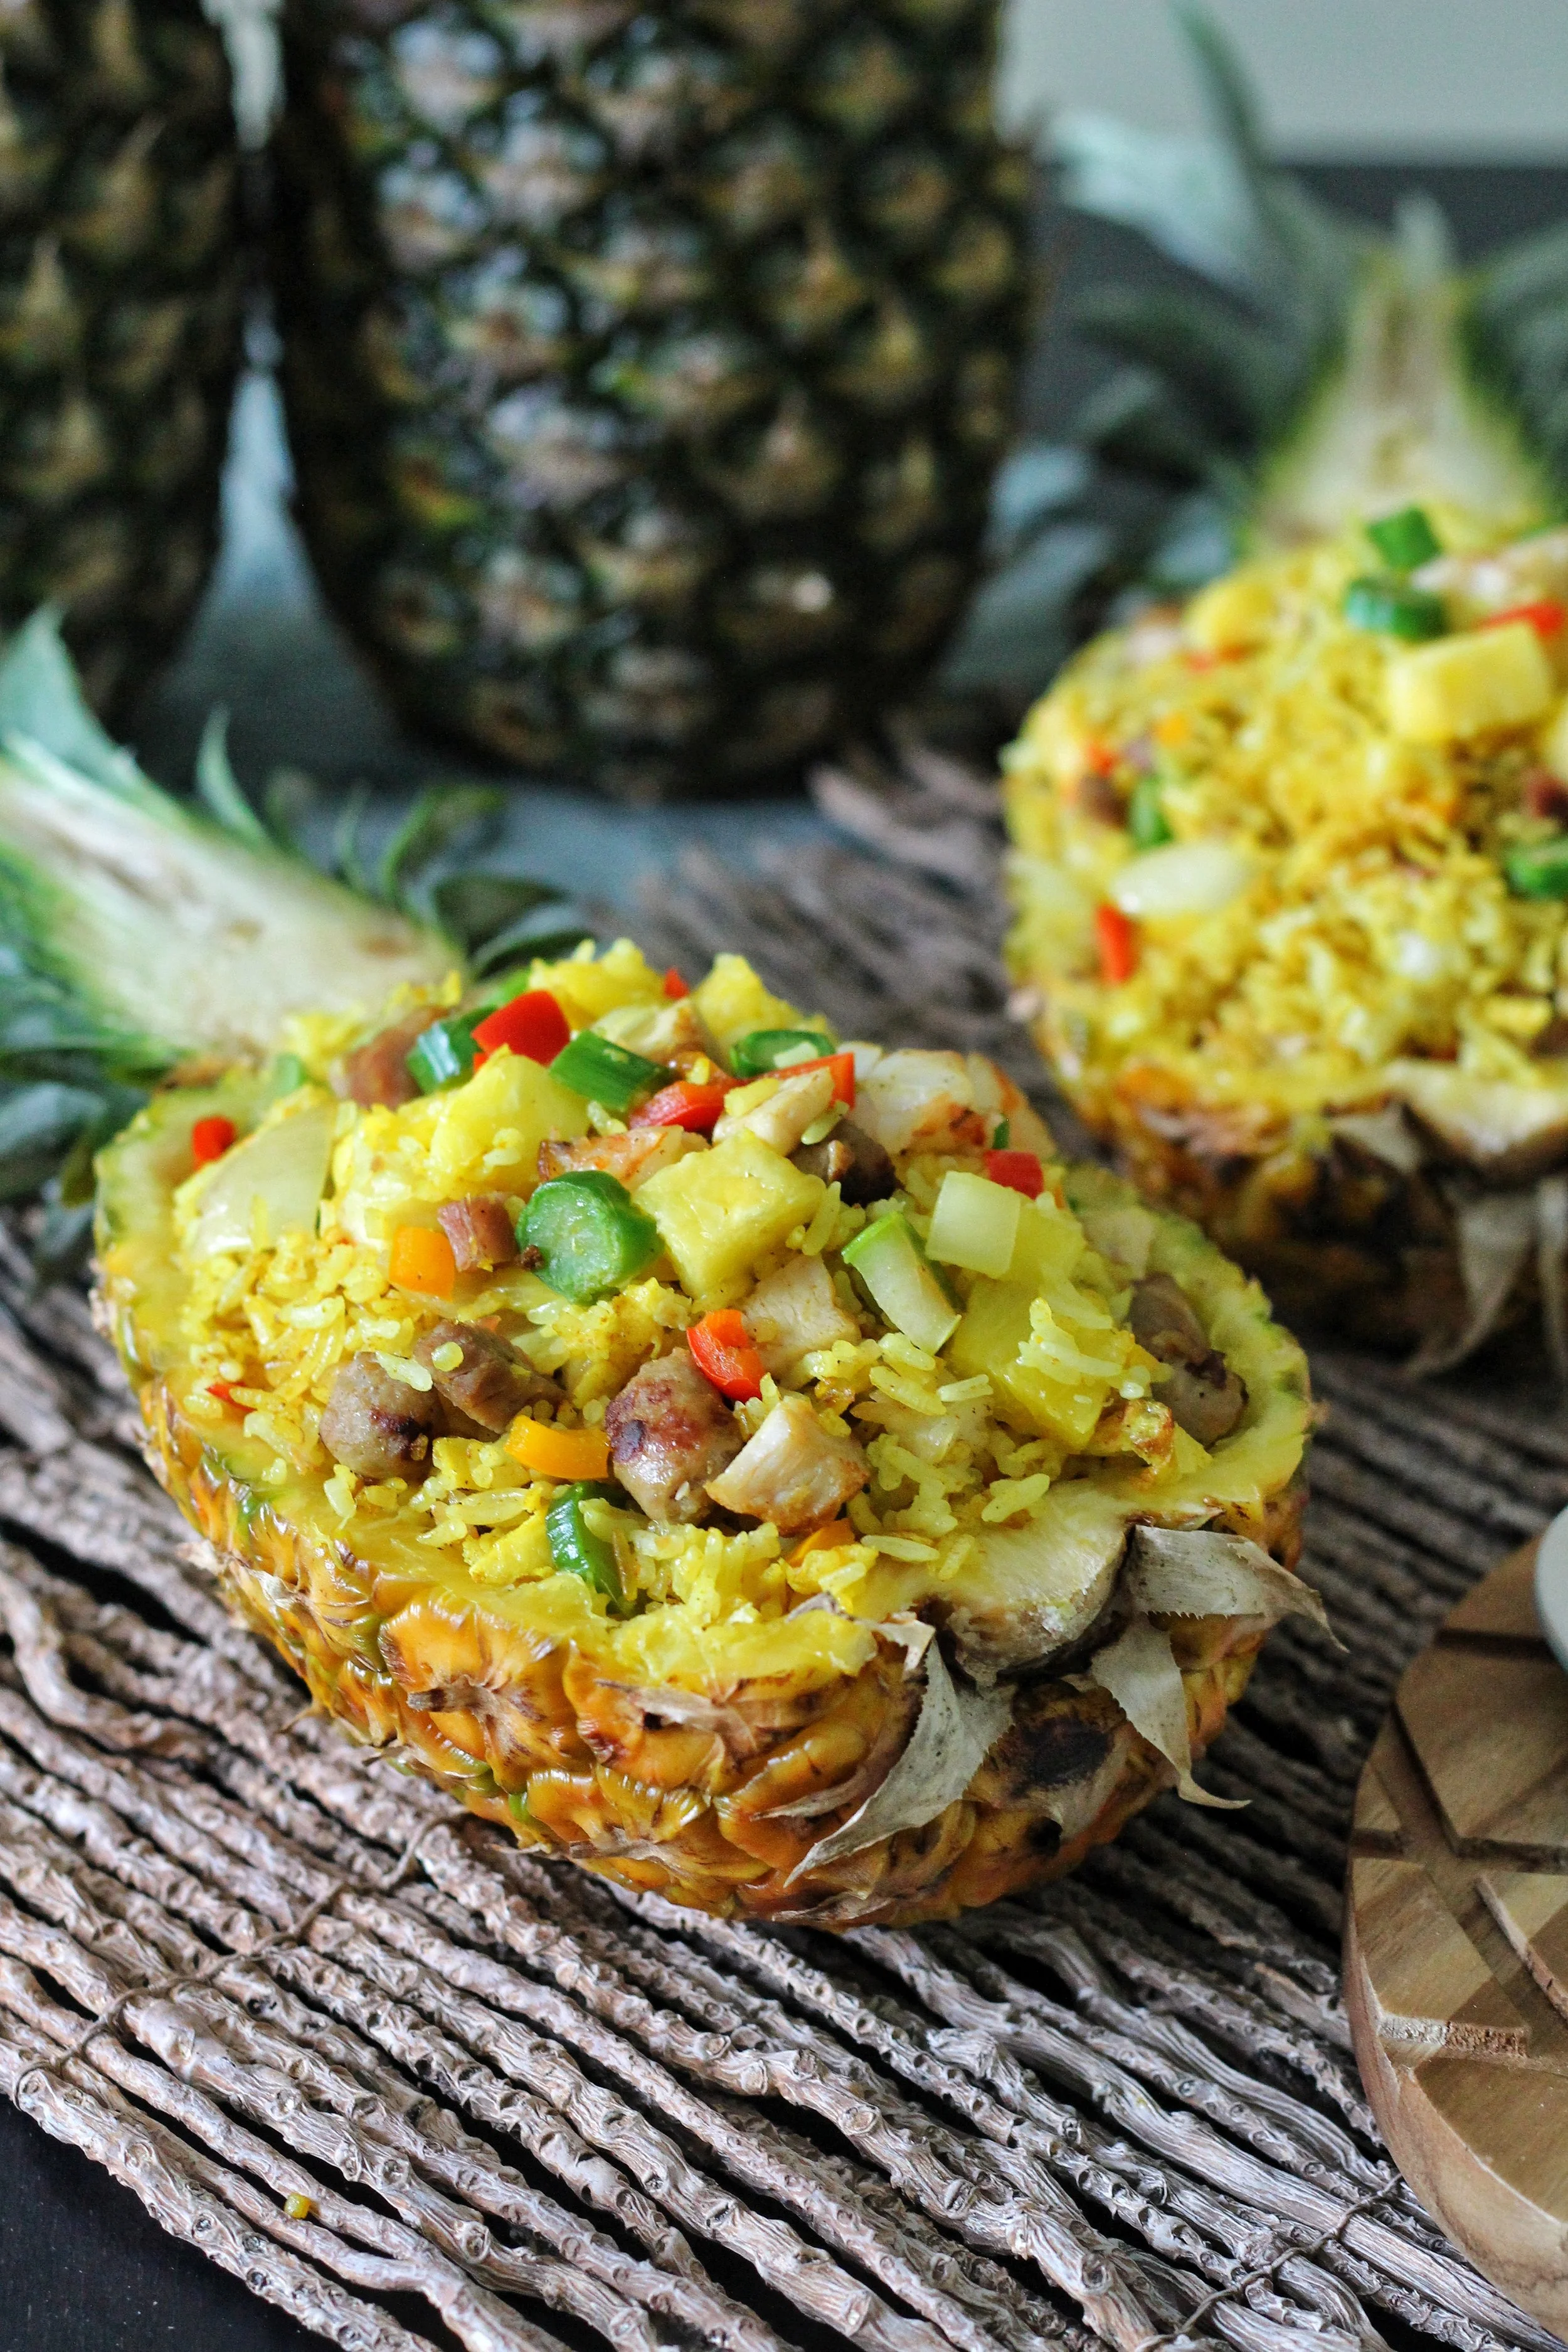
Instead of craving it at restaurants all the time, I've decided to create my own Pineapple Fried Rice at home using some of Lilydale's poultry products as inspiration, especially since we are celebrating such a momentous occasion. This is a great lunch or dinner recipe to make for your friends and family, and my favourite part of making fried rice is it incorporates leftovers! Leftover refrigerated rice from the night before is key because it needs to be cold in order to retain the chewy, distinct texture that fried rice has. If its fresh cooked rice it becomes sticky and warm and your fried rice will turn out soggy. Nonetheless, this meal comes together very quickly and is a perfect recipe for beginners as it's incredibly simple to make. In its simplest form you are essentially just chopping up the ingredients and throwing it all together in a pan. Yet the end result is so rewarding because when served inside a pineapple shell the presentation of the dish gets taken to a whole new level and you suddenly look like a masterclass chef to all your family and friends. It's the power of the pineapple shell I tell ya!

For this fried rice recipe I've decided to not just use one Lilydale poultry product, but two. That's just how fried rice works; you can almost add whatever you want into it to make it your own. And since I'm so indecisive, I decided to incorporate both of the Lilydale's Oven Roasted Carved Chicken Breast and Lilydale's Breakfast Turkey Sausage into my recipe. How can you just choose one protein when Lilydale produces such superb chicken and turkey products to use. Got to go with both!

Lilydale Oven Roasted Carved Chicken Breast - fully cooked and carved cuts of Canadian lean chicken breast

Lilydale Oven Roasted Carved Chicken Breast - fully cooked and carved cuts of Canadian lean chicken breast

Lilydale Breakfast Turkey Sausage - 65% less fat and 50% less calories than regular pork breakfast sausages.

Lilydale Breakfast Turkey Sausage - 65% less fat and 50% less calories than regular pork breakfast sausages.

If you're ever wondering where to find that specific Lilydale poultry product you want to use in your fried rice recipe or any other recipe, head on over HERE to their store locator and find the retailers that carry the Lilydale products.

Pineapple Chicken Fried Rice with Turkey Sausage

Prep Time: 15 minutes
Cook Time: 20 minutes
Total Time: 35 minutes
Servings: 4

Ingredients:

1 fresh ripe pineapple
1/2 package of Lilydale Oven Roasted Carved Chicken Breast, sliced
4 Lilydale Breakfast Turkey Sausages
1/2 pound of baby shrimp (optional)
1 1/2 cup of leftover, refrigerated jasmine rice
1 medium onion, finely chopped
1 small red pepper, finely chopped
1 small orange pepper, finely chopped
1 bunch Chinese broccoli, cut into 4cm lengths
4 garlic cloves, minced
2 eggs
2 tablespoons vegetable oil, divided
2 teaspoons curry powder
2 teaspoons sugar
salt and pepper to taste

IMG_9129-01.jpeg

Directions:

1) Cut the pineapple in half, length wise and hollow each one of them. Remove the core which is in the centre of each half. Cut the flesh of the fruit into small chunks.
2) Heat oil in skillet set over medium heat. Saute Lilydale Breakfast Turkey Sausages for 10 minutes or until sausages are cooked through. Transfer to plate and slice into small chunks. Set aside.
3) Meanwhile, in a different pan, heat the oil and add the garlic and onion. Cook for a minute or so, until fragrant.
4) Add the Lilydale Oven Roasted Carved Chicken Breast and cook until browned for a few minutes (we are simply re-heating the chicken here as the Lilydale Oven Roasted Carved Chicken Breast comes ready-to-eat)
5) Make space in the pan and beat in the two eggs. Quickly stir fry to scramble.
6) Add in the red pepper, orange pepper, baby shrimp (optional), and Chinese broccoli. Cook for another 3 minutes.
7) Add in rice and the Lilydale Breakfast Turkey Sausages. Mix well.
8) Add in the curry powder, sugar, salt and pepper to taste. Toss until the rice and chicken are evenly coated.
9) Stir in the pineapple chunks. Cook for 2 to 3 minutes more.
10) Serve in the pineapple shells. Bon appetit!

IMG_9137-01.jpeg
IMG_9154-01.jpeg

New Ways to Tanqueray

With almost a 200 year heritage the original 1830s Charles Tanqueray gin recipe is still being re-invented and enjoyed by people all around the world. If you go to any bar or restaurant the classic gin and tonic is bound to make it on the menu. It's a classic. I mean I just had a Gin & Tonic at my friend's wedding this past weekend! No matter the occasion whether it's at a fancy affair or just a casual night in with your friends, there are endless refreshing and delicious ways to enjoy a Tanqueray cocktail. 

Now re-launching in Canada, Tanqueray Malacca is one of the world's most awarded and expertly crafted gins. Malacca is known as a mischievous, flavourful gin that uses an exotic mix of peppercorn, rose, and clove to achieve its distinctive flavour. Providing the perfect base for creative DIY twists for your cocktails this season I have three fun and easy recipes that you can all try at home!

Each of these three recipes require the same base:

1 Part Tanqueray Malacca
4 Parts Tonic Water
Ice Cubes

How To Mix:

Fill your glass up with ice cubes. Add all the ingredients. Garnish with a lemon twist, cucumber swirl, or grapefruit wedge. 

IMG_7944-01.jpeg
IMG_9375 (1)-01.jpeg
IMG_9358-01.jpeg

Tanqueray provides the classic foundation for a delicious and refreshing beverage. No matter how you put your own spin on it with your favourite garnish, the recipe is fool proof with the high quality gin at its core. For even more inspiration on new ways to Tanqueray so you can serve up that perfect gin and tonic, visit the Tanqueray Canada Facebook page HERE and remember to enjoy responsibly. 

At Home With The New Vitamix Explorian Series E310 - Chilled Green Pea Soup Recipe

If there's one kitchen appliance that tops the wish list for everyone year after year, most will probably say it's owning a Vitamix. It definitely was for me. The versatility of having a compact machine in your kitchen with a motor and blades powerful enough to make a wide range of recipes such as smoothies, salsas, doughs, frozen desserts, batters, and even hot soups without ever touching a stove top is a dream!

With a new year upon us comes new ideas and innovation from Vitamix. A brand new line of Vitamix blenders were being launched and I was invited to take part in a culinary journey hosted by Vitamix Canada and Chef Craig Wong of Jackpot Chicken in Toronto to see what the new Vitamix Explorian Series E310 was all about! A carefully curated menu was prepared for us where all the key ingredients of each dish was prepared by the new E310 Explorian Series Blender.

From start to finish, check out what we indulged in that night where the Vitamix E310 played an integral role in our dinner.

Flash forward a few weeks after the media launch and my grown-up, kitchen-appliance loving dreams came true! A brand new Vitamix E310 Explorian Series Blender landed on my door step and a flood of recipe possibilities through the simple act of blending came rushing through. What I love about this new series is that it perfectly fits my lifestyle and kitchen space. I don't have a huge kitchen at home, but because the Vitamix E310 is smaller than its predecessor coming in at a 48-ounce (1.4L) container it fits perfectly into my kitchen space without taking too much room on the counter. The smaller container size is also perfect to blend drinks fit for one or two people, nothing goes to waste. The smaller size also comes with a smaller price tag compared to some of the other models with a price point of CAD$400 which is what people have been asking Vitamix to come out with for a very long time. They listened!

If you're finally in the market to upgrade your smoothie game and want to get a great quality blender, but at a manageable price-point, the Vitamix Explorian Series E310 is then perfect fo r you! Here are some great features of the new Vitamix Explorian Series E310 that you'll love!

Variable Speed Control

Ten variable speeds allows you to refine every texture with culinary precision from the chunkiest salsas to the smoothest purees

Pulse Feature

Layer coarse chops over smooth purees for heartier recipes or thick vegetable soups

High-Performance Motor

The powerful 2HP motor can handle the toughest ingredients to create high-quality blends

Easy Cleaning

With just one drop of dish soap and warm water, the Vitamix E310 can clean itself in 30 to 60 seconds -  no disassembly required.

With all these great features I was able to put it all to the test at home by re-creating the exact same recipe that Chef Craig Wong made for us during the series launch at his restaurant. The "Chilled Green Pea Soup" was among one of the favourite dishes of the night and surprisingly so easy to make with the Vitamix E310 at home. You literally just need to throw in all the ingredients in the Vitamix and let it blend! All the work is done by that powerful motor and spinning blades. Before you know it a vibrant and healthy appetizer is ready to be served for a serving of 4 people. Enjoy!

Chilled Green Pea Soup

Ingredients

5 cups frozen peas
4 cups cold chicken or vegetable stock
1/4 cup mint leaves
1/4 cup baby spinach leaves, blanced, shocked in ice, squeezed of excess moisture
1 tbsp salt
1/2 tbsp ground white pepper
1/2 cup heavy cream

Directions

Add frozen peas & stock into Vitamix
Blend on high for 3 to 5 minutes until mixture is very smooth
Add mint, spinach, salt & white pepper. Blend for another 30 seconds
Add heavy cream and blend for 10 seconds
Strain the soup and refrigerate or serve chilled immediately

Summer Fresh Holiday Entertaining

Can you all believe it!? Christmas is here in just under two weeks and probably like most of us it's going to be one of the busiest two weeks of the year. Juggling with last minute Christmas shopping and holiday gatherings, the lead up to Christmas day can be an exhausting one especially if you plan on hosting a holiday meal with your family and friends. Lets face it, often times you end up spending hours on end in the kitchen pumping out dishes for your guests, but this year I am here to show you that holiday entertaining does not have to be time consuming if you have the right recipes in mind. This year by using Summer Fresh products you will be able to make some delicious holiday appetizers that can all be prepared in under 10 minutes and will satisfy your guests with every bite! 

If you are not familiar with Summer Fresh, catch up by reading my older articles here and here! But to give you all a quick refresher, Summer Fresh is a Canadian success story that has found a way into many of our lives at home through their line of salads, hummus, and dips. Made from clean ingredients with no added preservatives, Summer Fresh makes it easy for you to enjoy mealtimes with your loved ones without spending hours on end in the kitchen.

For this holiday season I've teamed up with Summer Fresh to create two brand new appetizer recipes for you all that are outrageously delicious yet takes only ten minutes to make! If you're in need of a new recipe idea to impress your guests at your upcoming holiday party, take a look below to learn how to make my "Honey Glazed Bruschetta" and my "Hummus and Cucumber Pita Bites." They are both to die for! 

Hummus and Cucumber Pita Bites

IMG_7543 (1)-01.jpeg

Recipe

1) Toast the pita bread in the oven and cut it into 6 to 8 slices
2) Spread a layer of Summer Fresh Roasted Garlic Hummus on each wedge
3) Cut your cucumber into thin slices and place two of them on top of the hummus on each wedge
4) Sprinkle with paprika
5) Dab a small spoonful of Summer Fresh Artichoke & Asiago Dip
6) Garnish with dill weed

IMG_7539-01.jpeg

Honey Glazed Bruschetta

IMG_7517-01.jpeg

Recipe

1) Use your favourite cracker/toast as the base
2) Spread a layer of Summer Fresh Traditional Brushchetta on each cracker/toast
3) Crumple a pinch of feta cheese on top
4) Top it off with one ball of Bocconcini
5) Drizzle everything with honey
6) Garnish with a leaf of parsley

IMG_7533 (1)-01.jpeg

For even more great holiday entertaining tips and inspiration, Summer Fresh has put together some fantastic food pairing ideas and created nine more unique and mouth-watering appetizer recipes for you to try this festive season. Pick up their free Summer Fresh APPYS Entertaining Guide in the refrigerated deli section at your local grocery store. A couple of my favourite recipes from them this year include their "Hummus & Baba Ghanouj Toasted Sweet Potato Rounds" and "Artichoke Asiago Spinach Stuffed Mushroom Caps." 

IMG_0175.JPG
IMG_0193.JPG

Masterchef Canada Mary Berg's Original Churro Recipe

If you recently finished marathoning a Netflix show like me and is in dire need to find a new show to watch, I have a mighty good suggestion right here for you! Around a month ago I was on set of Masterchef Canada's Season 3 Winner Mary Berg's brand new cooking show, "Mary's Big Kitchen Party" and saw her whip up some delicious things! Premiering last month already in October, we all get to see Canada's favourite home cook make some of her best dishes for an entourage of some of her closest friends. If you haven't read my full experience of my visit on set and my one-on-one interview with her yet, you can play catch up by clicking HERE.

MB [1].JPG

Rolling out over 8 weeks on Bell Fibe TV1 and Gusto TV, Mary's Big Kitchen Party will see her create original recipes with unique ingredients in an effort to bring people together in her favourite room of the house - the kitchen! From seared scallops with crispy pancetta and poke crisps to peach pecan cake with burnt caramel and gingerbread whoopee pies with eggnog cream, each week will give viewers something new to try, allowing them to bring the party home.

When I was on set and watched the TV filming magic happen before me, I was able to witness Mary make these most delicious looking churros for her guests to eat. It was hard not to hear my stomach grumble as I watched from far away the entire cooking process of making this fried treat come to life. After filming was done I was able to grab one to eat and in my honest opinion, best churro I have EVER had! It was mindblowingly good and because it was just that tasty I made sure that I was able to share this amazing recipe to all my loyal readers!

Enjoy and don't forget to tune in every Friday at 9PM on Gusto TV and OnDemand on Fibe TV, Channel 1 to catch Mary make even some more mouth-watering recipes!

Mary Berg's Original Churro Recipe

MBKP Churros [3].JPG

Serves 8

Ingredients

1 cup water
½ teaspoon salt
2 tablespoons sugar
1 ½ tablespoon unsalted butter
1 ½ teaspoon vanilla
1 cup all purpose flour
Vegetable oil, for frying
½ cup sugar
2 teaspoons cinnamon
Store bought chocolate sauce

Directions

In a small saucepan over medium heat, combine the water, salt, sugar, and butter.  Bring this mixture to a boil, add the vanilla, and dump in the flour all at once.  Stir the mixture with a wooden spoon until it forms a ball.  Remove from the heat and continue to stir for about 30 seconds.

Allow the mixture to cool and heat 3 – 4” of vegetable oil in a large, heavy bottomed pot to 375F.  Mix the sugar and cinnamon in a bowl and set aside.

Spoon the slightly cooled churro mixture into a piping bag fitted with a star tip and pipe a few churros at a time into the hot oil by piping and snipping with scissors.  Fry the churros until golden and drain on a paper towel lined plate.

While still hot, place the churros in the cinnamon sugar and toss to coat.  Allow them to cool slightly and serve warm with store bought chocolate sauce.