Uncovering the Versatility of Parmigiano Reggiano with a Pear and Honey Tart Dessert Recipe!

What’s the first thing that comes to mind when you think of Parmigiano Reggiano? Personally, my mind goes immediately to pasta. There’s nothing better to elevate a pasta dish than to sprinkle some cheese on top. But what if I stepped outside my comfort zone? Will my taste buds react negatively if let’s say I incorporate cheese into a dessert? From all the previous years of having cheese in savoury dishes, there’s admittedly some doubt telling me that cheese would not work well with my sweet tooth cravings. Cheese belongs on pizza. It belongs on pasta. Heck, if it’s a cheese curd, it definitely belongs on a poutine. Dessert though? I don’t know about that. Can it!?

Let’s make one thing clear here though. Parmesan and Parmigiano Reggiano are not the same thing. When you go to a restaurant in Toronto and your server comes by your table and asks if you want any Parmesan sprinkled on top of your pasta, most likely you are not getting Parmigiano Reggiano but instead an imitation of it which many of us in North America know as Parmesan cheese.

Italy has strict laws governing the ingredients, production, and aging process of Parmigiano Reggiano. In fact, authentic Parmigiano Reggiano is only produced in five regions of Italy - Parma, Reggio Emilia, Modena, Bologna, and Mantua. That’s why it’s also a PDO (Protected Designation of Origin) product as it embodies the strongest links to the place in which they are made from. Every part of the production, processing, and preparation process must take place within their designated regions in order for it to be registered as PDO. Within these five regions specific to Parmigiano Reggiano production, you’ll also only find three ingredients used to produce this naturally lactose-free cheese.

  • Milk - raw, unpasteurized milk produced only in the Parmigiano Reggiano area of origin and is delivered within two hours from the end of the milking session

  • Salt

  • Rennet - a natural enzyme from calf intestine

Even with its simple and limited ingredients, the production and aging process is precise and perfected. Each wheel is aged minimum for a year and goes through a thorough inspection from the Consortium before it can even get an official seal of approval. And just like fine wine, Parmigiano Reggiano also gets more flavourful the longer they age:

  • 12-18 month maturation tends to be mild and sweet

  • 22-24 month maturation develops a grainier and savoury flavour

  • 36 month maturation has a strong salty and nutty flavour

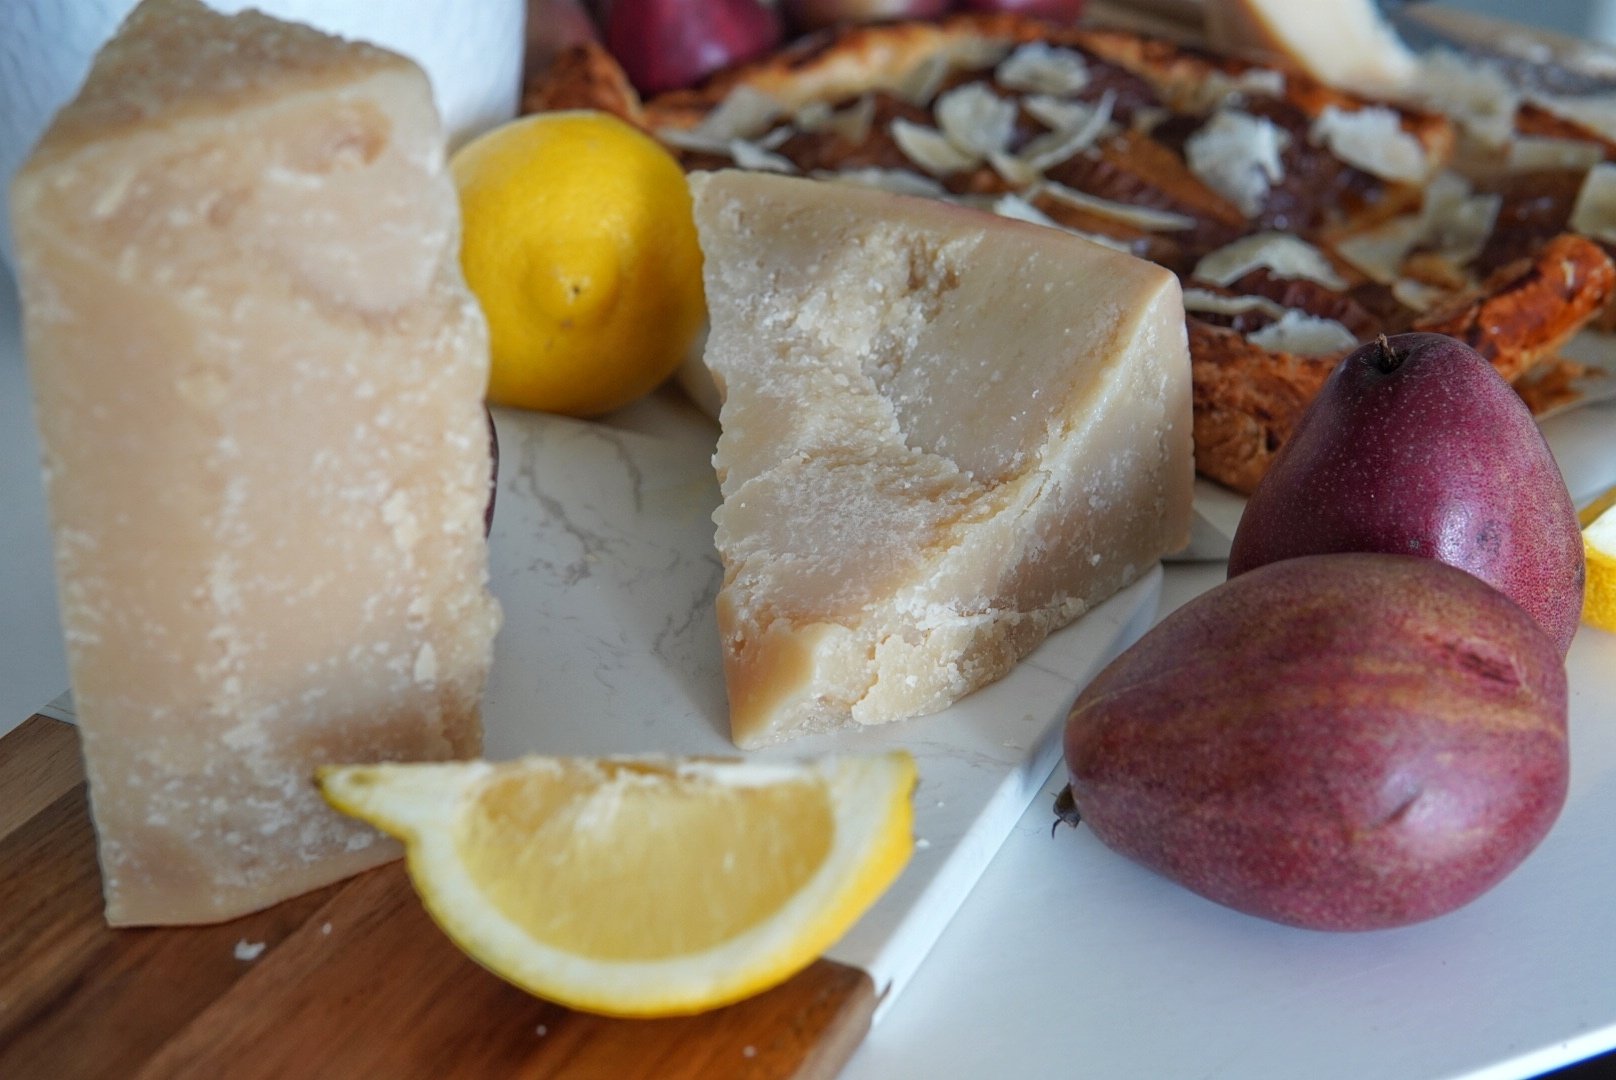
No matter how long it’s aged for though, each wheel of cheese takes 550 litres of milk to make and weighs on average 40kg. And if you want to know if you are buying genuine Parmigiano Reggiano, here’s a tip! The rind will always be embossed with dotted letters that has the name of the cheese, date of production, and seal of approval from the Consortium. If you do not see this then you’ll know immediately the Parmigiano Reggiano is not authentic. However, if you do notice all of those features on the rind then bingo, you got yourself some genuine Parmigiano Reggiano! Don’t forget to eat the rind too as it actually contains tons of flavour.

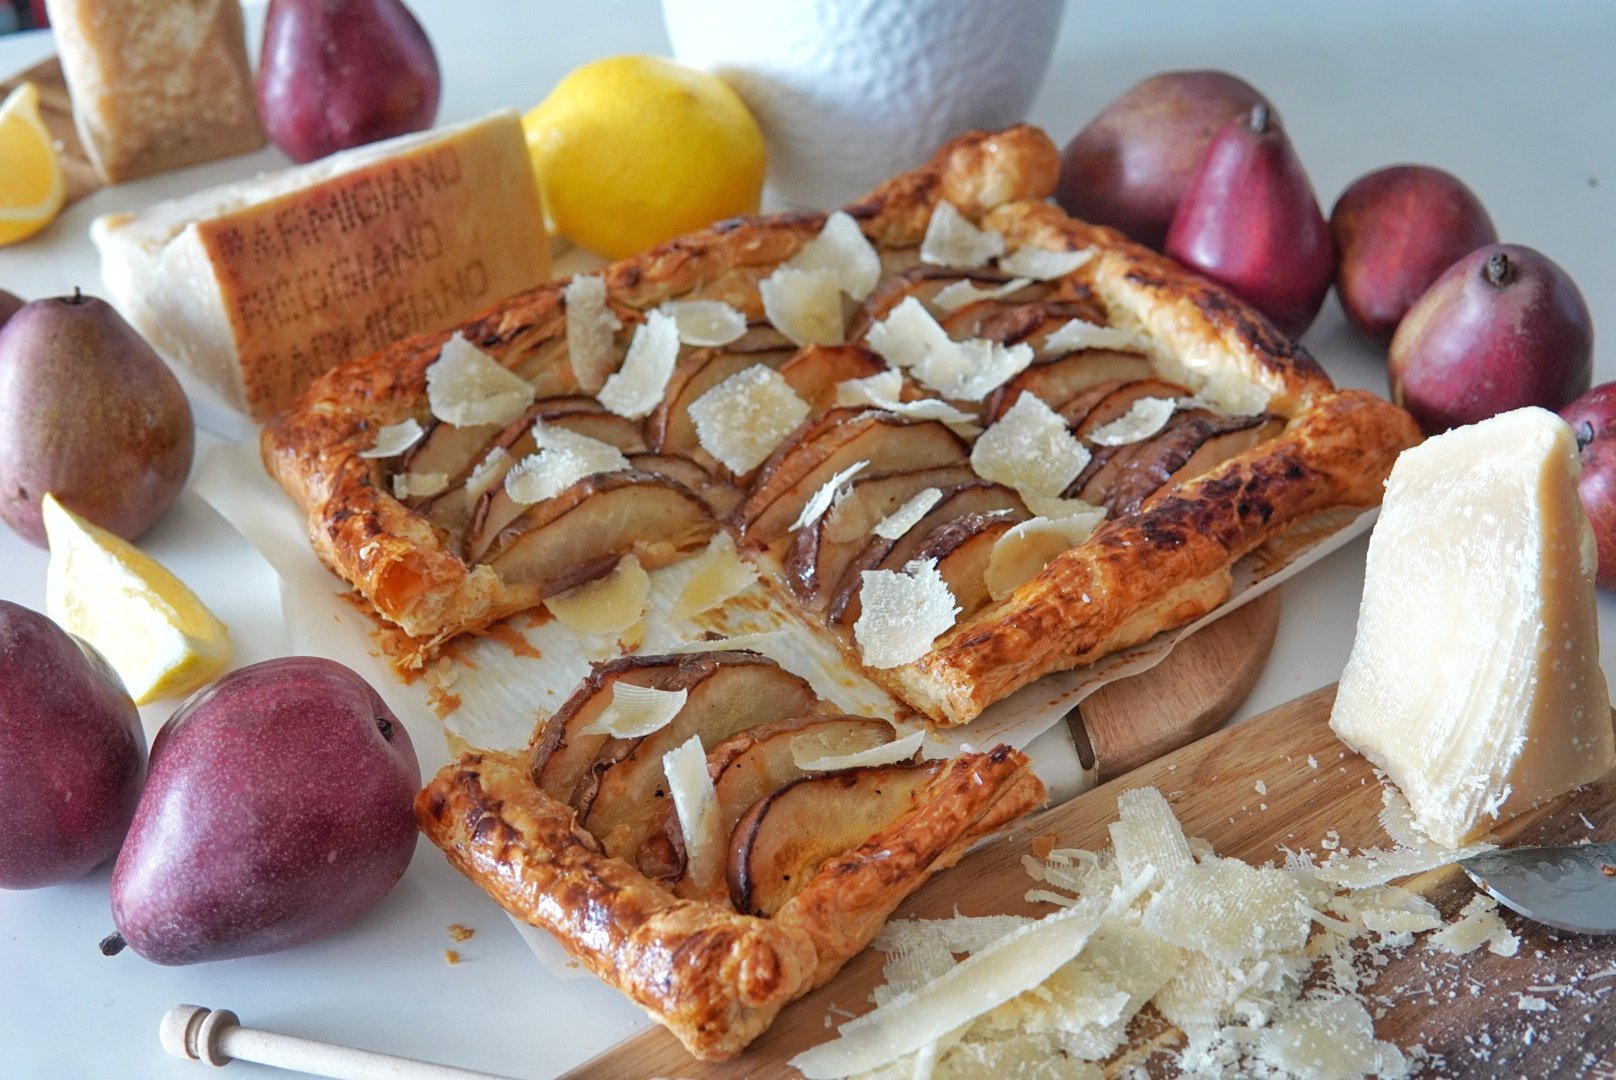
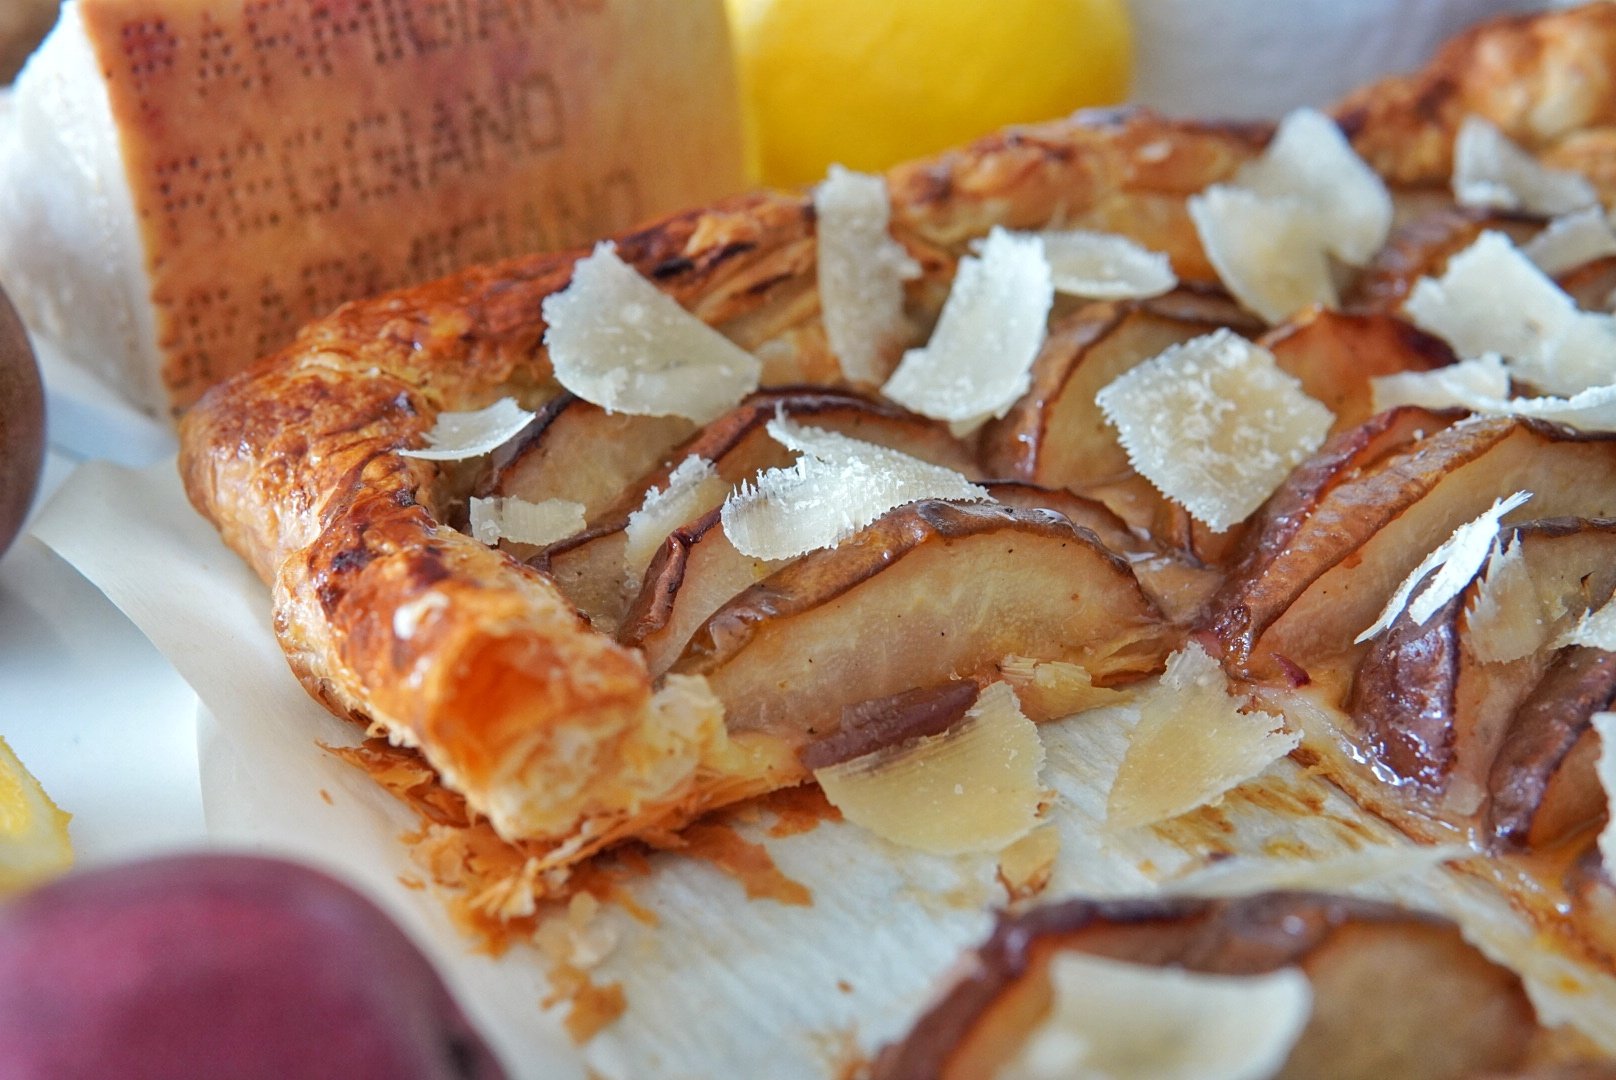
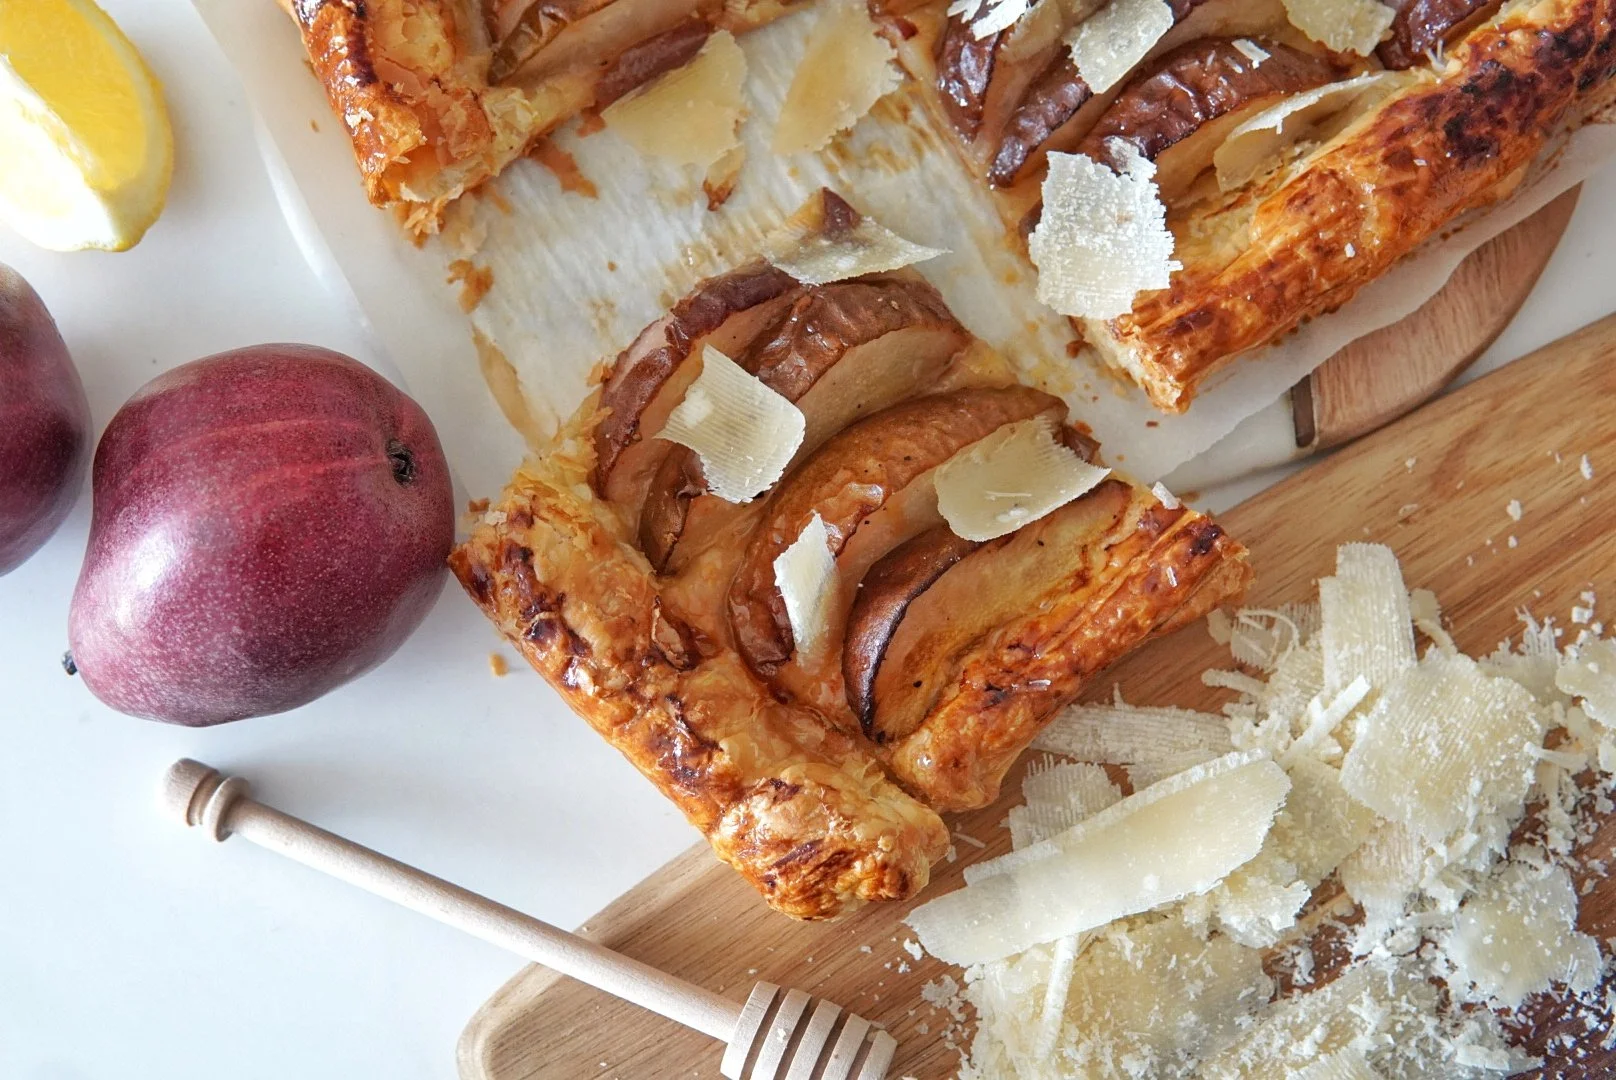
Keeping all of that in mind, I’m here to tell you today that cheese is not just for savoury dishes and it’s time for all of us (including myself) to step outside of our culinary comfort zones and enjoy cheese in sweet dishes as well! Parmigiano Reggiano should not just be sprinkled on pasta alone. You can also incorporate it into desserts for a perfectly balanced sweet and savoury dish that can be enjoyed with friends and family! This Pear, Honey, and Parmigiano Reggiano Tart recipe I created highlights these sweet and savoury flavours from its juicy red pears, a flaky crust, fragrant honey, and of course garnished by our star ingredient here - genuine Parmigiano Reggiano! Feel free to also eat the cheese alone during the baking process because I sure did.

For this recipe I chose a 24 month maturation (however any maturation will be just as tasty) as the Parmigiano Reggiano has reached its optimal age to be enjoyed with its richness of aromas and flavours that are in perfect balance and harmony. The taste evolves through a balance of sweet and savoury notes with hints of fresh fruit (banana, pineapple), citrus, alongside notes of nuts (walnut, hazelnut) and spices (nutmeg) that can generally be experienced. The cheese now becomes perfectly soluble, crumbly, and grainy which adds an incredible texture to this delicious tart.

This dessert recipe is exceptionally simple to make and great for beginner bakers with a limited list of ingredients required. My full recipe is below and I cannot wait for you to try!


Pear, Honey, and Parmigiano Reggiano Tart Recipe

Prep Time: 10 minutes

Bake Time: 30 to 35 minutes

Serves: 4

Ingredients

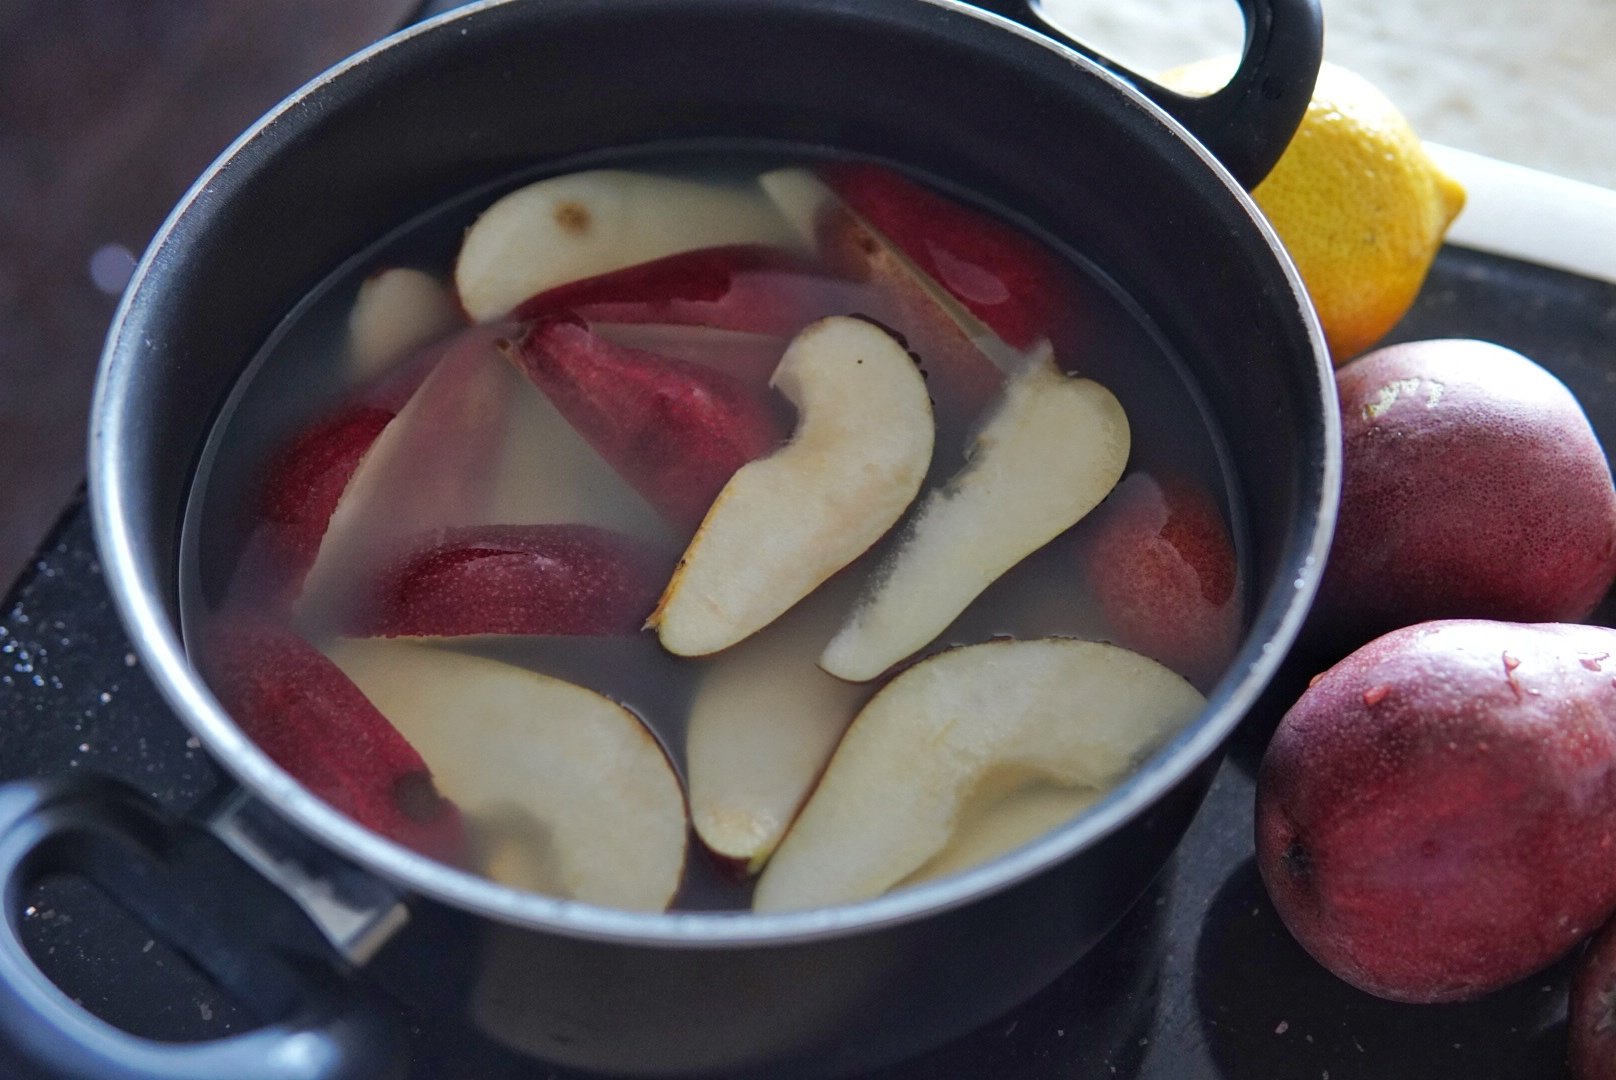
  • 1 pound firm ripe-red Anjou pears (unpeeled), cored, and cut into 3/4 inch thick wedges

  • 1 pack butter Puff pastry (rolled and room-temperature)

  • 1 large egg beaten

  • 1/4 cup honey

  • 2 tablespoons unsalted butter, melted

  • 2 tablespoons cornstarch

  • 1 teaspoon grated lemon zest

  • 1 tablespoon fresh lemon juice

  • Shaved Parmigiano Reggiano

  • Salt and Pepper to taste

Directions

  1. In a large bowl, toss together pears, honey, butter, lemon zest and lemon juice. Add in the cornstarch, pepper, and salt; stir until well combined.

  2. Arrange the pear filling in the centre of the pastry dough, leaving a 2-inch border. Fold uncovered dough edges inward by about 1 & 1/2 inches, pleating dough to form a crust and gently pressing down. Brush crust lightly with a beaten egg.

  3. Bake in preheated oven at 375F until crust is golden brown and filling is thickened and bubbly for 30 to 35 minutes. Remove from oven; let it cool for at least 15 minutes. Drizzle with additional honey, and garnish with shaved Parmigiano Reggiano. Slice and serve.

Indian Style Butter Halloumi - Meals Made Easy with Chef's Table

Is there anyone like me who is always running out of fresh ideas on what to cook at home? I mean the same pasta dish can only go so far! Meal-kit deliveries in 2022 are definitely not a new idea anymore, and in fact there are countless companies to choose from. I’m sure by now whether it may be yourself or a friend, you know someone that’s currently enrolled in a meal-kit delivery program. I was before as well with various companies that I tried, but would often cancel the subscription because for the most part I just got tired of the same old recipes that were being offered week after week.

Having tried many meal-kit delivery services, I’m usually on the hunt for one that is of great value, but I’ve also learned that you need to pick a company that doesn’t always just recycle the same old recipe. In today’s culinary climate, I need more than just the convenience factor. I need innovation and excitement. I want to learn new techniques and be exposed to different flavours and combinations of ingredients that I didn’t think would go well together, yet can be pleasantly proven wrong once I took that risk of trying a recipe out of my comfort zone.

That’s why I’ve always gravitated towards Chef’s Plate, one of the very first meal-kit delivery companies in Canada, and in my opinion the very best one when it comes to a combination of value, service, and meal variety. However, there are probably still people out there who have never heard of Chef’s Plate before or know what this type of service is, so if that is you, here’s a quick run down of what Chef’s Plate is all about.

Chef’s Plate is a meal-kit delivery service where you order off a weekly menu from their website, pick various recipes you want to try and make for yourself, and within a few clicks of your mouse you’ll have set up a drop-off time where a box of all the necessary ingredients needed for your recipes will be picked out and delivered straight to your door! You can skip going to the grocery store and have a full meal prepared in a fraction of the time because the ingredients are also pre-portioned. Just follow the simple laid-out steps in the accompanying recipe cards and have a delicious home-made meal prepared in 15 to 30 minutes!

As I mentioned earlier, one of the strengths of Chef’s Plate is they don’t have just generic recipes. The revolving door of weekly recipes to try are always innovative and delicious, that touches upon every cultural cuisine possible. You’ll never get bored because there’s always something new and unique you haven’t seen before.

For example, take one of the most popular dishes out there - Butter Chicken. Most people have eaten Butter Chicken before or at least have heard of the dish, but the great thing about Chef’s Plate is they often times love to put their own unique spin on a classic dish. Now of course there are times where you need to stick with the classic formula, but when you’re at home and want to experiment and get exposed to new flavours and ingredients, why not choose something that you probably would have never made yourself. And it’s fool proof when you have step-by-step instructions in your recipe card to follow.

And for those reasons that’s why I was immediately drawn to their “Indian Style Butter Halloumi with Basmati Rice” recipe. A vegetarian twist on Butter Chicken (and I’m not even vegetarian!), but I do love me some Halloumi cheese! If you’re just as intrigued as me, I’m here to share one of my favourite Chef’s Plate recipes I’ve come across. And the great thing about ordering from Chef’s Plate is you get to keep those recipe cards and re-make the dish again and again for friends and family. Have a try for yourself and let me know if you like this Butter Chicken recipe - with a twist!

Indian-Style Butter Halloumi with Basmati Rice

Ingredients

Halloumi Cheese - 200 g
Sweet Bell Pepper - 160 g
Garlic Cloves - 1 unit
Crushed Tomatoes - 200 ml
Tomato Sauce Base - 2 tbsp
Cream - 56 ml
Basmati Rice - 3/4 cup
Yellow Onion - 113 g
Indian Spice Blend - 1 tbsp
Cilantro - 7 g
Mild Curry Paste - 2 tbsp

Directions

1) Gather all your tools, wash and dry all produce and then start the recipe. To a medium pot, add rice and 1 1/4 cups water (double for 4 portions). Season with salt. Bring to a boil over high heat. Once boiling, cover and reduce heat to medium-low. Cook for 12-15 min, until rice is tender and water is absorbed. Stir in 2 tbsp butter (double for 4 portions). Set aside for 5 min, off heat and still covered.

2) Meanwhile, rinse halloumi, then pat dry with paper towels. Cut into 3/4-inch cubes. Peel, then cut onion into 1/2-inch pieces. Cut pepper into 1/2-inch pieces. Peel, then mince or grate garlic. Finely chop cilantro.

3) In a large non-stick pan, heat 1 tbsp butter over medium-high heat. When the pan is hot, add halloumi. NOTE: Don't overcrowd the pan; cook halloumi in 2 batches for 4 portions, using 1 tbsp butter per batch!) Cook for 1-2 min per side, until golden-brown. Transfer halloumi to a plate and set aside.

4) To the same pan, add 1 tbsp oil (double for 4 portions), onions and peppers. Cook for 2-3 min, stirring occasionally, until tender-crisp. Add Indian Spice Blend, curry paste and garlic. Cook for 30 sec-1 min, stirring often, until fragrant.

5) To the same pan, add tomato sauce base, crushed tomatoes, cream and 1/2 cup water (double for 4 portions). Bring to boil over high. Once boiling, reduce heat to medium-low. Simmer for 3-4 min, stirring occasionally, until sauce thickens slightly. Season with salt and pepper.

6) To the curry, stir in halloumi. Season with salt and pepper. Serve rice with halloumi and butter sauce over top. Sprinkle with cilantro. Enjoy!

Smoked Salmon Carpaccio Using Acme Smoked Fish - A Brooklyn Staple

It’s very rare these days to find a company with over 100 years of history and experience, especially ones that are still surviving and thriving. Frankly,. it’s a dog-eat-dog world out there and any company that can even stay afloat for 10 years should be considered a huge success let alone any company with over 100! For Acme Smoked Fish, it’s a company that was founded all the way back in 1906 in Brooklyn, New York by Harry Brownstein and is now a fourth-generation, family-owned smokehouse that specializes in smoked salmon and other types of smoked fish that has literally been feeding its customers for over a century! A Century!!!!

Their smoked salmon and other specialty smoked fish can already be found in restaurants, retailers, and bagel shops alike from coast to coast in the United States, and just last year they also launched their e-commerce business where they are now able to deliver fish from their smokehouse directly to homes all around the U.S. From keeping up with their traditions that have marked their past, inspire their present, and shape their future, the fact that they are able to adapt with the changing times and modern technologies have allowed Acme Smoked Fish to continue to find success decade after decade after decade.

With their stellar reputation in the seafood industry in having some of the best smoked fish in the world, not only do our neighbours down south get to enjoy these great products, we can now enjoy them here in Toronto as Acme has just recently expanded their reach to the Great White North. You’ll now be able to find some of their signature smoked fish in several retailers here across the city!

In fact, I thought Smoked Salmon was really just of one variety. A rookie’s mistake. If you visit their website you will literally see an endless variety to choose from. Options for all kinds of taste buds. Some of which can now be obtained in Toronto which includes:

Smoked Atlantic Salmon

Lox or Nova or Smoked Salmon, whatever you call it, this is the gold standard of smoked fish. Each succulent ribbon of smoked salmon reveals the perfect balance of a rich yet delicate smoked fish flavor as it melts away in your mouth with its buttery smooth texture and light hint of hardwood smoke. This family smoked salmon recipe, perfected and passed down through generations, uses carefully selected salmon prepared with a traditional dry curing method and then cold smoked over blends of natural hardwoods. This renowned Acme Classic Smoked Salmon is a result of true Brooklyn smoked fish craftsmanship. Enjoy this classic smoked fish taste of New York all the way here in Toronto.

Smoked Atlantic Salmon with Gravlax Seasoning

The tantalizing aroma of a traditional Scandinavian specialty with a Brooklyn smoked fish twist, Acme’s Gravlax smoked salmon is a delectable contrast of rich color, flavor and texture to add to any smorgasbord. Lightly smoked salmon is enveloped in fresh dill and carefully sliced for a bright and delicate savory smoked fish bite.

Smoked Atlantic Salmon with Togarashi Seasoning

Inspired by the Japanese seasoning shichimi togarashi, meaning “seven-flavor chili pepper”, Acme Smoked Fish’s Smokehouse Exclusive Togarashi Smoked Salmon is a multifaceted flavor experience! Lightly spicy, with a tang of citrus and ginger, and rounded out with umami notes that hint of seaweed, this delightfully complex spice complements Acme’s delicate smoked salmon.

Smoked Atlantic Salmon with Pastrami Seasoning

Combining two iconic tastes of New York, traditional pastrami spices are added to the signature smoked salmon of Acme Smoked Fish. The result is a peppery, tangy, smoked fish flavor experience with just a hint of smoke. Enjoy this smoked salmon on a bagel, cracker, or classic rye bread for the full pastrami experience.

Smoked Whitefish (bone-in, fully cooked)

Acme’s hot smoked wild caught whitefish is bursting with rich flavors steeped in tradition. This golden, white-fleshed, fresh water fish from the Great Lakes provides a delectable smokey flavor that is perfect for any meal.

With all of these amazing smoked salmon varieties at my finger tips, you just know I had to create a recipe that would showcase Acme’s family tradition of quality. What better way to do that then making a Smoked Salmon Carpaccio! Normally a carpaccio just uses one type of fish, but because I have the luxury this time of having four different types, this smoked salmon carpaccio is elevated to another level where I have incorporated their classic Smoked Atlantic Salmon and with the other three Smoked Atlantic Salmon seasonings of Gravlax, Togarashi, and Pastrami. Literally something for everyone!

This recipe is then topped off with fried capers and herbs to make the ultimate appetizer to share with your friends and family. Not only does this recipe only take around 15 minutes to make, most of the ingredients you need for this are staple pantry items. Using the Acme Smoked Salmon as the star ingredient, it then gets lightly marinated in a lemony-shallot dressing which is then topped off with crispy pan-fried capers and fresh dill to truly make this dish a stand-out favourite.

Smoked Salmon Carpaccio (Four Ways) With Crispy Capers and Dill

Time: 15 minutes
Serves: 6 people

Ingredients

For The Dressing:

1/4 cup extra virgin olive oil
1 clove garlic, minced
1 tablespoon fresh lemon juice
1 teaspoon grainy dijon mustard
1 small shallot, thinly sliced

For The Crispy Capers:

2 tablespoons drained capers
1 teaspoon flour
2 tablespoons extra virgin olive oil

For The Salmon:

100 gram Acme Smoked Atlantic Salmon
100 gram Acme Smoked Atlantic Salmon with Gravlax Seasoning
100 gram Acme Smoked Atlantic Salmon with Togarashi Seasoning
100 gram Acme Smoked Atlantic Salmon with Pastrami Seasoning
1 tablespoon loosely chopped fresh dill to garnish
Freshly cracked black pepper to garnish


Instructions:

For the Dressing:

  • In a bowl, combine all the dressing ingredients and whisk until well combined. Set aside while you prepare the capers.

For the Crispy Capers:

  • In a small bowl, toss the drained capers in the flour until evenly coated.

  • Heat a small nonstick skillet over medium heat with olive oil. When the skillet is hot, add the capers to the skillet and cook until golden brown and crisp, about 3 minutes, tossing half way through. Transfer the capers to a paper towel lined plate and let cool.

For the Smoked Salmon:

  • Cut the four varieties of Acme Smoked Salmon into 2-inch pieces and arrange on a large plate in a single layer.

  • Spoon the dressing over the salmon evenly. Next, top with crispy capers. Lastly, finish the dish with fresh dill and cracked pepper.

Bonus:

  • Serve with a side of ready-to-eat Acme Smoked Whitefish! Enjoy!

List of Toronto Retailers Carrying Acme Smoked Fish Products

PRIMROSE BAGEL
SUE’S DONHEAD
KOSHER SOBEYS
VINCENZOS
NU BAGEL
MCEWANS
NEW YORK BAGEL
KIVAS BAGEL
NU AGE FISH
NORTOWN MEATS EGLINTON
NORTOWN MEATS PROMENADE
NORTOWN MEATS YORK MILLS
SAVOURS SOUTH
SAVOURS NORTH
THE KOSHER GOURMET
UNITED BAKERS
CONCORD FOOD CENTRE
HARBORD BAKERY
MENCHENS CATERING
YOSEF MOKIR
OCTAGON REST
ABAS BAGELS
SOUL BAGEL
CAFÉ SHELI
D-LITES
TORONTO KOSHER
NO FRILLS WILSON

Italpasta Introduces a New Artisan Pasta Line with Big Impact!

If you’re anything like me, craving a comforting bowl of pasta is always on my radar. Pasta is one of my favourite things to eat, and also one of my go-to dishes to make at home just because for the most part you can whip up a bowl of pasta quite quickly that would also leave you with leftovers for days! So as you can imagine I’m always walking up and down the grocery aisle grabbing more boxes of my pasta to restock my pantry.

Italpasta has always been a brand of pasta that I bought frequently. If this brand doesn’t sound familiar to you yet, just think of the blue pasta packaging with the cellophane window, and more than likely the image of this brand will come rushing back to you. Italpasta has been a staple in homes of Canadian families since 1989. I love that they are inspired by the age-old Italian way of making high-quality pasta, yet I’m still supporting a Canadian company that uses 100% Canadian wheat. This results into what I think to being a rougher texture that helps the pasta sauce cling to the pasta for a fuller and more delicious bite.

Italpasta has also recently launched a new Artisan pasta range, and surprisingly that’s actually not the most impactful change for their company. In an effort to be more conscious of food waste, they have made a commitment to encourage a zero food waste approach to cooking as part of the company’s sustainability commitment to fully transition their signature cellophane window boxes and bulk plastic bags to 100% recyclable packaging by 2030! So not only is this new Artisan pasta line made with 100% Canadian wheat, it also uses 100% recyclable packaging with the removal of the cellophane window. And honestly to me, the packaging looks even better now with a more modern and sleek look wrapped in this beautiful darker blue hue. This might be a small change, but it makes a huge impact as we all strive to become more environmentally conscious in protecting our mother Earth.

This Italpasta Artisan pasta range comes in six different varieties. There is the Artisan Fusilli, Artisan Maccheroni, Artisan Gemelli, Artisan Penne Rigate, Artisan Spaghetti, and the Artisan Spaghettini. There’s literally something to like for everyone! Every one of these pasta varieties are made in Canada, certified kosher, non-GMO, and vegan. Of course when it comes to new and shiny things, I obviously had to give one of these new artisan pastas a whirl and test a recipe out. You know…. for science.

I was immediately drawn to the Artisan Gemelli just by it’s beautiful shape and decided to make a cold pasta dish with it from one of the Italpasta recipes on their website. I love a good pesto as well, so making their “Gemelli & Asparagus With Watercress Pesto” recipe was a no-brainer for me. I did add my own twist to it as I couldn’t find watercress at my local grocery store, so I substituted that with Arugula which is very similar to the taste and texture of watercress. It came out absolutely delicious and a beautiful dish to look at with the pop of green that comes out from the pesto and asparagus. As it’s a cold pasta, it can be eaten as a quick appetizer or even a hearty lunch. It’s fresh, light, and healthy and if you squint your eyes just a bit you’ll be thinking you’re even eating a salad! I highly, highly recommend making this recipe as it’s so easy to make and only 20 minutes total to whip it up! A perfect dish to impress your family and friends with at your next gathering.

Gemelli & Asparagus with Arugula Pesto

Prep Time: 10 minutes

Cook Time: 10 minutes

Serves: 6

Ingredients

  • 1 pkg (450 g) Italpasta Artisan Gemelli

  • 1/2 lb (250 g) asparagus spears, trimmed and cut into 1-inch (2.5 cm) pieces

  • 1/2 cup (125 mL) toasted walnuts, divided

  • 2 cloves garlic, whole

  • 1 1/2 cups (375 mL) arugula, packed

  • 1/2 cup (125 mL) packed fresh parsley, chopped and divided

  • 1/3 cup (75 mL) extra virgin olive oil

  • 2 tbsp (30 mL) lemon zest

  • 3/4 tsp (4 mL) salt

  • 1/2 tsp (2 mL) pepper

  • 1/4 cup (60 mL) Pecorino cheese, grated

  • 2 tbsp (75 mL) Parmesan cheese, grated

  • 1/3 cup (75 mL) Parmesan cheese, shaved

Instructions

  1. Cook pasta according to package directions, adding asparagus in the last 2 minutes of cooking time. Drain and refresh under cold running water; drain well and set aside.

  2. In food processor, pulse 1/4 cup (60 mL) walnuts and garlic until finely ground. Add arugula, half of the parsley, olive oil, lemon zest, salt and pepper; pulse until smooth. Stir in Pecorino and Parmesan until blended.

  3. In bowl, toss together pasta, asparagus and watercress pesto. Serve at room temperature or refrigerate for 1 to 2 hours to serve chilled.

  4. Just before serving, garnish with shaved Parmesan, and remaining walnuts and parsley.

Celebrating Lunar New Year with a Pork Spring Rolls Recipe using DuBreton

Celebrating Chinese New Year with my family is always a momentous occasion. We celebrate the beginning of a new year on the traditional Chinese calendar marked with special gatherings with family and friends that's ALWAYS accompanied with lots and lots of delicious food!

With 2019 being the Year of the Pig, you just know that pork is going to be on the dinner table. One of the dishes that is always a hit in my family are Spring Rolls, so of course to mix it up this year I added pork as the special ingredient!

I partnered with DuBreton and used their Organic Pork products to make my "Pork Spring Rolls" truly stand out. They're a Canadian company that's at the forefront of the organic and Certified Humane pork production in North America, where their pigs are raised crate-free, fed a high-quality grain diet, with no antibiotics used whatsoever.

They offer a full range of organic pork products that include ground pork, sausages, bacon, and pork loin cutlets.

RECIPE:

500g DuBreton Pork Loin Cutlet, thinly sliced
2 Garlic Cloves, minced
1 Red Onion, chopped
1 cup Cabbage, shredded
2 Medium Carrots, shredded
1 cup Bean Sprouts
1/4 cup Coriander, chopped
2 Tbsp Soy Sauce
10 sheets Spring Roll Wrapper
Salt and Pepper to taste

DIRECTIONS:

➡️ Mix pork, garlic, and onion into frying pan on medium heat until pork is cooked through.

➡️ Add in cabbage, carrots, bean sprouts, coriander, and soy sauce and cook for another 5 minutes. Place spring roll mixture in a bowl and let it cool.

➡️ Put mixture into center of the spring roll wrapper. Fold in the edges and roll into a rectangular parcel.

➡️ Heat 4 to 5cm of oil in a pot and fry spring rolls until golden brown. Serve with Sweet Chili dipping sauce.

Available at major grocery stores including T&T Supermarkets, Whole Foods, Longo's, and Metro. I hope everyone enjoys these Pork Spring Rolls and have a happy Lunar New Year!!

Standing the Test of Time With Tanqueray London Dry Gin

As minutes move forward we find moments and things that will stand the test of time. Take the song “Yesterday” by the Beatles, “I Have a Dream” by Martin Luther King, grandma’s famous lasagna recipe, or heck what about Toronto Raptor Kawhi Leonard’s buzzer beater in Game 7 vs the Sixers. These are all things that will be talked about and enjoyed for years to come no matter how long ago it happened.

Although gin isn’t normally included in lists of this nature, I would argue that it very well should be especially when it comes to a long-standing classic like Tanqueray. Its founder Charles Tanqueray created this gin all the way back in the 1830s over 180 years ago, and to this day it is still enjoyed by millions of people worldwide. On top of that, they are still winning accolades in 2019. For the 7th year in a row, Tanqueray has won the “Bartender’s Favourite Gin” award as voted on by the World’s Top 50 Bartenders (2019 Drinks International Annual Bar Report).

The one thing that all these moments and things have in common that allow them to stand the test of time is quality. Quality in the music notes on a page, the words behind a motivational speech, ingredients in a family recipe, or just a generational sport talent. It’s what what makes something last beyond the years of you and I. Tanqueray is no exception.

Charles only used the finest quality botanicals to perfect his gin recipes. In fact, he created over 300 gin recipes that inspired all the Tanqueray variants we have today. It didn’t come easy though. Charles experimented with many ingredients, tasting only the finest botanicals from all around the world. After extensive trials, he discovered a perfectly balanced recipe that combined a rich, full flavour with a bold and invigoration taste. This ultimately led to the birth of what we know today as Tanqueray Gin.

Most gins are mixed with tonic water. Tanqueray London Dry Gin has distinct flavour profiles that make it truly unique and versatile! The variant I really fell in love with was their classic London Dry gin. It consists of four perfectly balanced botanicals that combine to produce one unmistakable taste. My favourite part of the Tanqueray London Dry Gin is how versatile it is and how easy it is to switch it up by just choosing a different garnish to go along with it.

The signature way to enjoy the Tanqueray London Dry Gin is just with tonic water and then garnished with a lime. You will find here below this signature recipe for you to try at home, and I also included two other quick variations with lemon and cucumber garnishes that will switch up the flavour profile, but still stay true to its strong heritage and taste.

Tanqueray London Dry Gin Signature Recipe

IMG_5499-01.jpeg
  • 1.5oz Tanqueray London Dry Gin

  • 3 oz Premium Tonic Water

  • Garnish with a Lime

  1. Add ice into glass.

  2. Pour Tanqueray London Dry Gin over ice

  3. Add tonic water

  4. Garnish with lime

Tanqueray London Dry Gin With Cucumber Garnish

IMG_5439-01.jpeg

Tanqueray London Dry Gin with Lemon Twist Garnish

IMG_5469-01.jpg

Happy to be a partner with Tanqueray this summer because whether you’re hosting a summer party for your friends this year or just drinking for one (no judgement here!), any of these Tanqueray London Dry Gin cocktails will do the trick. Let me know below which one of these cocktails is your favourite, or better yet if you created your own way to enjoy it I would love to know that too! Remember to enjoy responsibly, whether it’s 1830 or 2019, because Tanqueray will still live on one glass bottle at a time. Cheers!

Going to Duck School at King Cole Ducks!

It’s that time of year again. The time where we reflect on the past 365 days of all our highs and lows as we ring in the new year. In what seems like a blink of an eye, 2018 has come and gone. For some it may be relief that a fresh start is on the horizon. For others it may be a year we don’t want to let go of with all the milestones and fond memories that were made. No matter what side you may fall on the spectrum, a new year can be a signal for new beginnings and new goals to achieve. Admittedly, my new year’s resolutions are not always achieved by the end of a year, but setting a few at the start is always something I aim to do. In fact, five years ago one of my new year’s resolution was to finally start up my food blog and Instagram account, which became the birth of the website and account The Everyday Foodie. Now with almost 30,000 followers I am beyond grateful that I followed through with that new year’s resolution, and kept it going five years later giving me this amazing platform and community that allows me to do what I love each day.

Now that it’s 2019 it’s time to pick another new year’s resolution! As a food blogger I often get asked if I’m also a good cook. The brutally honest truth is…. not at all! I’m a superstar when it comes to eating. I’m pretty good at taking pictures of it too. But when it comes to cooking that’s a whole different story. Cooking for me has always posed a challenge. I’ve always wanted to learn new recipes and sharpen some cooking techniques, yet year after year it’s something I’ve put on the side. But not this year. Not in 2019!

I decided this is the year for me to turn it around, and what better way to make sure this new year’s resolution gets off to a good start then by enrolling in a cooking class! Located in Stouffville, Ontario King Cole Ducks has almost 70 years of experience in producing duck products spanning four generations in a family run farm. With customers all around the world, King Cole Ducks is the brand of choice with chefs across the globe and of course with chefs here locally as well.

With so many well-established chefs that trust and use their products, King Cole Ducks offer a cooking class called “Duck School.”It’s a night full of food and fun where you get to learn how to cook duck like a pro from a roster of talented local chefs right on the duck farm itself!

IMG_1923-01.jpeg

The class I enrolled in was led by Chef Forrest Liu, the Executive Chef at Terre Rouge located in downtown Markham. Born and raised in Shanghai, Forrest began his career at a young age, interning at Three on the Bund by Jean Georges, becoming the first ever intern hired at the Shanghai Flagship. He then decided to move to Canada to complete the Culinary Management program at George Brown College, where he then landed jobs at some of the most renowned kitchens in Toronto including One Restaurant, Canoe, George, Lee Restaurant, Carmen’s Steak House, and Toca at the Ritz Carlton. With his experience and expertise there was no better person then Chef Forrest Liu to teach me how to cook in my very first cooking class experience!

Below you will get to see the three duck dishes he taught and made for the class, which included a soup, appetizer, and entree. I also included a few duck recipes that I’ve learned from Chef Forrest Liu that will surely be useful to have in anyone’s recipe arsenal at home. Recipes that I myself will attempt to re-create at home as part of my 2019 new year’s resolution!

IMG_1934-01.jpeg
IMG_1935-01.jpeg
King Cole Farms Duck Soup - Braised Duck, Taro, Vermicelli, Baby Bok Choy

King Cole Farms Duck Soup - Braised Duck, Taro, Vermicelli, Baby Bok Choy

King Cole Farms House Smoked Duck Breast Salad - Baby Beets, Persimmon, Blue Cheese, Arugula, Quinoa & Lemon Parmesan Dressing

King Cole Farms House Smoked Duck Breast Salad - Baby Beets, Persimmon, Blue Cheese, Arugula, Quinoa & Lemon Parmesan Dressing

King Cole Farms Seared Duck Breast - Garlic Mashed Potatoes, Roasted Acorn Squash, Grapes, Swiss Chard, Verjus & Rosemary Powder

King Cole Farms Seared Duck Breast - Garlic Mashed Potatoes, Roasted Acorn Squash, Grapes, Swiss Chard, Verjus & Rosemary Powder

Braised Duck Soup

Ingredients:

1 Whole Duck
15L Water
50g Ginger, peeled
1 bunch Green Onions, chopped
3pc Garlic
2pc Bay Leaves
100g Cooking Wine
10g Goji Berries
300g Baby Bok Choy
200g Vermicelli
1pc Taro, cut into 1” cubes
Salt and Pepper to Taste

Directions:

  1. Put duck into stock pot and add 15L water. Bring to a boil and skim the stock until it is clear.

  2. Add ginger, green onions, garlic, goji berries, bay leaves into stock pot and simmer at medium heat for 4 hours.

  3. Check the duck (the meat should be falling off the bones). Add the taro and simmer for 15 minutes

  4. Add baby bok choy and vermicelli for another 5 minutes

  5. Season to taste

Duck Fat Mashed Potatoes

Ingredients:

400g Potato
150g Cream
50g Duck Fat
50g Butter
Salt and Pepper to Taste

Directions:

  1. Peel the potatoes and cut into 1” cubes as much as possible into stock pot.

  2. Add water and salt into stock pot. Bring the water to a boil. Simmer on medium heat for 15 minutes or until soft.

  3. Strain the water and put the potato in the potato ricer. As you rice each round, add a small amount of butter and duck fat so everything can be mixed well together

  4. Add cream to finish and season with salt and pepper.

IMG_1957-01.jpeg

Duck School is a two hour class. The evening includes the lesson, a full dinner, and a duck goodie bag to take home for only $75. These are going to be skills and recipes you can keep and use forever! If you are also looking to brush up on your cooking skills this 2019 as your new year’s resolution, or just something you want to check out later on in the year visit HERE to book your spot at their next class! They do fill up fast so be sure to reserve your spot before it’s too late.

Have an amazing 2019 year everyone! Looking forward to what’s ahead!

The Market & Co Experience at Upper Canada Mall - How To Make Kombucha At Home

I’ve done my fair share of food experiences over these last five years since I started The Everyday Foodie. From visiting food halls, farmer markets, restaurants, cafes, and grocery stores I’ve seen them all, but not many stood out to me and left an impression quite like my visit here to Market & Co inside Upper Canada Mall in Newmarket, Ontario. I really didn’t know what to expect at first coming here because to be honest I wasn’t 100% sure what this was. Was it a food court? Was it a restaurant or a grocery store? Or was it a space where people gather here for workshops and unique events? I’ve soon found out that Market & Co encompasses all of that and more!

IMG_1127-01.jpeg
IMG_1157-01.jpeg
IMG_1158-01.jpeg
IMG_1159-01.jpeg
IMG_1160-01.jpeg

The second you walk through those doors, you are immediately greeted my a bright and large indoor space where a combination of your local baker, butcher, seafood market, produce, flower shop, and trendy restaurants are all rolled into one curated market. It’s a one-stop shop for all your food and culinary needs with 20 best-in-class artisans and merchants ready to satisfy your every need (click HERE to view a list of all of the current artisans and merchants at Market & Co). There is literally something for everyone here. If you have a sweet tooth like me there is even a section that you can literally find any candy you ever wanted imaginable. It’s nuts!

IMG_1161-01.jpeg
IMG_1162-01.jpeg

With that being said, Kitchen & Co is probably my most favourite part of this space. It’s a contemporary kitchen space and demonstration area in the heart of the market offering fun and educational opportunities for guests to cook, create, learn, and enjoy all the food and ingredients offered inside the market. It’s a community hub like no other, offering all kinds of weekly workshops, tastings, and activities that guests can sign-up on their website to register for interactive food experiences. Some examples of their classes include:

  • Oysters 101 & Tasting with World Record Holder “Shucker Paddy”

  • Thanksgiving Centrepiece Workshop

  • Master The Ultimate Bakery Style Cupcake

  • Create a Swoon Worthy Charcuterie and Cheese Board

  • Pasta Making with Acclaimed Chef Michael Angeloni

This is just a very small sample size of the types of classes Kitchen & Co offer year round. For me personally with so many unique and fun classes they were offering, it was hard to choose which first class I would be interested in attending when browsing through their schedule. Scanned the calendar a little bit more and bingo! The “Brew Your Own Kombucha Workshop” was calling my name!

Hosted by Village Juicery and certified Holistic Nutritionist Danielle Wiens, this 1.5 hour workshop was a step-by-step class on learning to brew kombucha at home!

IMG_1132-01.jpeg
IMG_1139-01.jpeg

So what is Kombucha?

Kombucha is a probiotic beverage, created through an ancient process of adding a SCOBY (symbolic community of bacteria & yeast), often referred to as “the mother” to sweet black tea. This living bacteria consumes the sugars within the tea (aka it ferments), leaving behind all kinds of compounds that are renowned for their health benefits including probiotic bacteria and several types of organic acids.

The moral of the story that we were taught in the workshop is basically to not like the SCOBY die! Feed it, nourish it, check up on it. Think of it as a new pet you inherited. Pet SCOBY! Without a living SCOBY there is no kombucha to brew. No pressure right?

Brewing kombucha at home is a two step fermentation process that takes around two weeks to complete from start to finish. As this is a living beverage, once you have your first successful brew under your belt, you’ll be able to use that SCOBY to brew literally endless kombucha at home. Follow these steps I learned here at the “Brew Your Own Kombucha Workshop” and you’ll be an expert at making your own kombucha at home in no time.

IMG_1141-01.jpeg

STEP 1: The 1st Ferment

Purpose:

  • To start new batch

  • Create fermentation

  • Grow your SCOBY so you can share it with others

What You’ll Need:

  • 1 black tea bag

  • 1/4 cup of organic sugar

  • 1 SCOBY

  • 1 brewing vessel (eg. glass jar)

Directions:

  1. Brew black tea in filtered water (1 tea bag + 1/4 cup of organic sugar per litre - don’t mess with this ratio!)

  2. Let it sit and adjust to room temperature (5 hours/overnight).

  3. Add piece of SCOBY, it can be any size, usually 3” is a good start. It will grow to cover the surface of your brewing vessel.

  4. Ferment for 7 - 10 days. Try after 7 days and decide when to start second ferment. The sweeter the final product, the less it needs to be fermented. The more sour/fermented it tastes, the longer you should ferment it for. It’s all your preference!

IMG_1154-01.jpeg

STEP 2: The 2nd Ferment

Purpose:

  • To add carbonation, C02

  • Add flavour

  • Bottle it up

What You’ll Need:

  • Glass bottles

  • Sugar and water to make simple syrup

  • Herbs of your choice

  • Strainer and funnel for bottling

Directions:

  1. Make Simple Syrup

    • 1 cup of sugar to 1 cup of water with optional unlimited herbs and roots of your choice

    • Add sugar, water, and optional herbs of your choice into pot

    • Let simmer allowing sugar to melt

    • Bring heat down to low temperature & cover

    • Let herbs sit in sugar/water to allow for the absorption of flavour

  2. Remove SCOBY by hand or with wooden spoons, and add to your SCOBY hotel (another glass vessel to temporarily stow it in).

  3. Strain kombucha into other vessel

  4. Bottle kombucha liquid into glass bottles

  5. Add 2 TBSP of simple syrup (carefully measured)

  6. Cap off sealed tight

  7. Ferment outside of fridge, at a moderate temperature, away from the sun for 2 - 3 days

  8. Place in fridge after 2 - 3 days to stop fermentation

  9. Enjoy!

IMG_1237-01.jpeg

Tips of Kombucha:

  • Bacteria is boss, everything we do in kombucha is to nourish and cultivate the yeast & bacteria cultures

  • Only use wood & glass utensils. Never allow metal to come in contact with your kombucha. It will affect the bacteria and kill the SCOBY.

  • Drop the soap! Never use soap in your vessel or on wooden spoons. Just use hot water to clean as an alternative.

  • Use filtered water & organic ingredients as fluoride, chlorine, or other commonly used chemicals can change the bacteria/yeast symbolic relationships

  • Temperatures matter. Fermentation ideally occurs between 23 - 29 degrees celsius. Temperature will also affect carbonation and flavour.

It’s amazing how much I’ve learned in just a short time at Market & Co. It’s not just about the food and drinks here, but obtaining more knowledge and a new skill set is what makes this place worth coming back over and over again. To see what upcoming classes are being offered at Market & Co that you may be interested in, click HERE to visit their calendar page and register your spot before they fill up! Share in the excitement with all your friends and family inside Market & Co at Upper Canada Mall to buy, learn, eat, and celebrate all of the delicious and amazing food it offers.

Grab & Go Four Ingredient Turkey Bacon and Egg Breakfast Cups Recipe - Cooking with Lilydale Part 2

The birthday celebrations just keep on going! If you've read my last recipe post you'll know exactly what I'm talking about. If not (no judgement here, everyone's busy) so let me give you a quick recap of exactly whose birthday we've been celebrating over here at The Everyday Foodie. It's Lilydale! Canada's premier poultry provider is celebrating its 75th anniversary this year, and there's no better way to celebrate one's birthday than by tearing up the kitchen and making some kick-ass food!

I've been busy creating some recipes with some of my favourite Lilydale products to celebrate this milestone, and today I'm going to share with you a dish for my personal favourite meal of the day.... breakfast!

  • If you missed my Pineapple Chicken Fried Rice with Turkey Sausage recipe I created last time with Lilydale you can check it out here. It's the perfect dish for lunch and/or dinner, and having it served inside a pineapple shell turns an average fried rice dish into a showstopper.

But back to this week's breakfast recipe that incorporates something that everyone loves to eat. BACON. Am I right? You can't have a proper breakfast without having bacon somewhere in the dish, yet many people do and who can fault them? Most of the time people will avoid having bacon for health reasons, which is perfectly understandable in my mind. With all the calories and fat involved even I tend to avoid it as much as I can for the sake of my arteries. Good news though. I found a solution! Going through all the products Lilydale offers I found the perfect substitute to regular pork bacon.

IMG_9289-01.jpeg

TURKEY BACON.

Lilydale Turkey Bacon - 70% less fat and 55% less calories than regular pork bacon.

Lilydale Turkey Bacon - 70% less fat and 55% less calories than regular pork bacon.

With 55% less calories and 70% less fat than regular pork bacon, Lilydale's Turkey Bacon is the perfect way to still cook up that bacon smell in the morning, and then indulge in it without any of the guilt.

Bacon and eggs are a breakfast classic, and I wanted to find an easy and fun way to enjoy them together in a non-traditional way. Turkey bacon is already pretty non-traditional, and so is.... a muffin pan. Yes, that's right you will need a muffin pan for this recipe because all of the whopping four ingredients needed for this recipe will be structured inside this muffin pan to create that cup shape we're aiming for. Once it gets baked in the oven, just like an ordinary muffin you can easily take it to go and eat it while you're on the move. Check out my recipe below and let me know what you think!

IMG_9291-01.jpeg

Grab & Go Four Ingredient Turkey Bacon and Egg Breakfast Cups

Prep Time: 20 minutes
Cook Time: 25 minutes
Total Time: 45 minutes
Servings: 6

Ingredients:

1 red potato, sliced 1cm thick, rounded ends discarded
1 small red pepper, finely chopped
1 package of Lilydale Turkey Bacon Style (12 strips total)
6 eggs
Salt and pepper to taste
Thyme, oregano, or chives to garnish (optional)

Directions:

1) Pre-heat the oven to 400 degrees F.
2) Grease up your muffin pan. In my opinion I would also recommend using paper baking cup liners on top of that. This not only allows you to easily take out the finished dish at the end, but it also ensures that all the ingredients (especially the runny egg) does not leak out.
3) Take 12 pieces of Lilydale Turkey Bacon out and cut 1/4 off each piece, as the standard size is too large in width.
4) Start to partially cook the Lilydale Turkey Bacon Style in a frying pan per package instructions. It should not be too crisp. We are just rendering a lot of the fat out of it, and it should still be pliable enough to wrap it inside the muffin pan without it snapping in half. Drain on paper towels and cool slightly.
5) Cut the potato in circles roughly the same size of the base of the muffin cup, about 1 cm in thickness and place one of them at the base of each muffin cup.
6) Fit two slices of Lilydale Turkey Bacon Style loosely around the sides of each cup, overlapping as necessary, lining the sides of the muffin cup to form the "cup."
7) Divide the finely chopped red peppers into six portions and then place a thin layer on top of the potato base in each muffin cup.
8) Finally, break the egg and add to the turkey bacon-lined cup on top of the red peppers and potato. Sprinkle the top of the egg with salt and pepper.
9) Bake at 400 degrees F for 15-20 minutes, or until the turkey bacon is cooked to crisp.
10) Run a spatula around the edges and remove to platter. Garnish as desired. Enjoy!

IMG_9313-01.jpeg
IMG_9330-01.jpeg

Pineapple Chicken Fried Rice with Turkey Sausage Recipe - Cooking with Lilydale

Birthday celebrations are always worthy of cooking up a storm in the kitchen, and we have a very special birthday worth celebrating! I'm talking about Lilydale and they’re turning 75! If you haven't heard about Lilydale before they were established 75 years ago as an Alberta Farmers cooperative, and now Lilydale has become Canada's premier poultry provider. They are committed to providing Canadians with wholesome and delicious products that only use 100% Canadian raised chicken and turkey from local farmers. With its signature green logo, their various poultry products ranging from deli meats, breakfast sausages, turkey bacon, frozen boxed products, carved and fresh turkey and chicken can all be found at local grocery stores across Canada. If you are ever in need of some poultry to complete your breakfast, lunch, or dinner recipe Lilydale is what you need to get!

Now as I said earlier birthdays are always worth celebrating, and the best way I know how is to celebrate through the taste buds! I've been going through a Thai cuisine phase lately and I've been hitting up some of my favourite Thai restaurants in the city. One dish I keep on ordering at these restaurants is Pineapple Fried Rice. And of course when it comes from a Thai restaurant more than likely the fried rice is served in a pineapple bowl! Pure genius if you ask me! Presentation is fun and you let nothing go to waste. Even the pineapple shell is used and it really is a wow factor when served to all your guests at a party. The juiciness from the pineapples mixed into the fried rice is my absolute favourite part of the dish, delivering another level of flavour and acidity to each bite that you won't be able to find in just ordinary fried rice.

IMG_9141-01.jpeg

Instead of craving it at restaurants all the time, I've decided to create my own Pineapple Fried Rice at home using some of Lilydale's poultry products as inspiration, especially since we are celebrating such a momentous occasion. This is a great lunch or dinner recipe to make for your friends and family, and my favourite part of making fried rice is it incorporates leftovers! Leftover refrigerated rice from the night before is key because it needs to be cold in order to retain the chewy, distinct texture that fried rice has. If its fresh cooked rice it becomes sticky and warm and your fried rice will turn out soggy. Nonetheless, this meal comes together very quickly and is a perfect recipe for beginners as it's incredibly simple to make. In its simplest form you are essentially just chopping up the ingredients and throwing it all together in a pan. Yet the end result is so rewarding because when served inside a pineapple shell the presentation of the dish gets taken to a whole new level and you suddenly look like a masterclass chef to all your family and friends. It's the power of the pineapple shell I tell ya!

For this fried rice recipe I've decided to not just use one Lilydale poultry product, but two. That's just how fried rice works; you can almost add whatever you want into it to make it your own. And since I'm so indecisive, I decided to incorporate both of the Lilydale's Oven Roasted Carved Chicken Breast and Lilydale's Breakfast Turkey Sausage into my recipe. How can you just choose one protein when Lilydale produces such superb chicken and turkey products to use. Got to go with both!

Lilydale Oven Roasted Carved Chicken Breast - fully cooked and carved cuts of Canadian lean chicken breast

Lilydale Oven Roasted Carved Chicken Breast - fully cooked and carved cuts of Canadian lean chicken breast

Lilydale Breakfast Turkey Sausage - 65% less fat and 50% less calories than regular pork breakfast sausages.

Lilydale Breakfast Turkey Sausage - 65% less fat and 50% less calories than regular pork breakfast sausages.

If you're ever wondering where to find that specific Lilydale poultry product you want to use in your fried rice recipe or any other recipe, head on over HERE to their store locator and find the retailers that carry the Lilydale products.

Pineapple Chicken Fried Rice with Turkey Sausage

Prep Time: 15 minutes
Cook Time: 20 minutes
Total Time: 35 minutes
Servings: 4

Ingredients:

1 fresh ripe pineapple
1/2 package of Lilydale Oven Roasted Carved Chicken Breast, sliced
4 Lilydale Breakfast Turkey Sausages
1/2 pound of baby shrimp (optional)
1 1/2 cup of leftover, refrigerated jasmine rice
1 medium onion, finely chopped
1 small red pepper, finely chopped
1 small orange pepper, finely chopped
1 bunch Chinese broccoli, cut into 4cm lengths
4 garlic cloves, minced
2 eggs
2 tablespoons vegetable oil, divided
2 teaspoons curry powder
2 teaspoons sugar
salt and pepper to taste

IMG_9129-01.jpeg

Directions:

1) Cut the pineapple in half, length wise and hollow each one of them. Remove the core which is in the centre of each half. Cut the flesh of the fruit into small chunks.
2) Heat oil in skillet set over medium heat. Saute Lilydale Breakfast Turkey Sausages for 10 minutes or until sausages are cooked through. Transfer to plate and slice into small chunks. Set aside.
3) Meanwhile, in a different pan, heat the oil and add the garlic and onion. Cook for a minute or so, until fragrant.
4) Add the Lilydale Oven Roasted Carved Chicken Breast and cook until browned for a few minutes (we are simply re-heating the chicken here as the Lilydale Oven Roasted Carved Chicken Breast comes ready-to-eat)
5) Make space in the pan and beat in the two eggs. Quickly stir fry to scramble.
6) Add in the red pepper, orange pepper, baby shrimp (optional), and Chinese broccoli. Cook for another 3 minutes.
7) Add in rice and the Lilydale Breakfast Turkey Sausages. Mix well.
8) Add in the curry powder, sugar, salt and pepper to taste. Toss until the rice and chicken are evenly coated.
9) Stir in the pineapple chunks. Cook for 2 to 3 minutes more.
10) Serve in the pineapple shells. Bon appetit!

IMG_9137-01.jpeg
IMG_9154-01.jpeg

New Ways to Tanqueray

With almost a 200 year heritage the original 1830s Charles Tanqueray gin recipe is still being re-invented and enjoyed by people all around the world. If you go to any bar or restaurant the classic gin and tonic is bound to make it on the menu. It's a classic. I mean I just had a Gin & Tonic at my friend's wedding this past weekend! No matter the occasion whether it's at a fancy affair or just a casual night in with your friends, there are endless refreshing and delicious ways to enjoy a Tanqueray cocktail. 

Now re-launching in Canada, Tanqueray Malacca is one of the world's most awarded and expertly crafted gins. Malacca is known as a mischievous, flavourful gin that uses an exotic mix of peppercorn, rose, and clove to achieve its distinctive flavour. Providing the perfect base for creative DIY twists for your cocktails this season I have three fun and easy recipes that you can all try at home!

Each of these three recipes require the same base:

1 Part Tanqueray Malacca
4 Parts Tonic Water
Ice Cubes

How To Mix:

Fill your glass up with ice cubes. Add all the ingredients. Garnish with a lemon twist, cucumber swirl, or grapefruit wedge. 

IMG_7944-01.jpeg
IMG_9375 (1)-01.jpeg
IMG_9358-01.jpeg

Tanqueray provides the classic foundation for a delicious and refreshing beverage. No matter how you put your own spin on it with your favourite garnish, the recipe is fool proof with the high quality gin at its core. For even more inspiration on new ways to Tanqueray so you can serve up that perfect gin and tonic, visit the Tanqueray Canada Facebook page HERE and remember to enjoy responsibly. 

At Home With The New Vitamix Explorian Series E310 - Chilled Green Pea Soup Recipe

If there's one kitchen appliance that tops the wish list for everyone year after year, most will probably say it's owning a Vitamix. It definitely was for me. The versatility of having a compact machine in your kitchen with a motor and blades powerful enough to make a wide range of recipes such as smoothies, salsas, doughs, frozen desserts, batters, and even hot soups without ever touching a stove top is a dream!

With a new year upon us comes new ideas and innovation from Vitamix. A brand new line of Vitamix blenders were being launched and I was invited to take part in a culinary journey hosted by Vitamix Canada and Chef Craig Wong of Jackpot Chicken in Toronto to see what the new Vitamix Explorian Series E310 was all about! A carefully curated menu was prepared for us where all the key ingredients of each dish was prepared by the new E310 Explorian Series Blender.

From start to finish, check out what we indulged in that night where the Vitamix E310 played an integral role in our dinner.

Flash forward a few weeks after the media launch and my grown-up, kitchen-appliance loving dreams came true! A brand new Vitamix E310 Explorian Series Blender landed on my door step and a flood of recipe possibilities through the simple act of blending came rushing through. What I love about this new series is that it perfectly fits my lifestyle and kitchen space. I don't have a huge kitchen at home, but because the Vitamix E310 is smaller than its predecessor coming in at a 48-ounce (1.4L) container it fits perfectly into my kitchen space without taking too much room on the counter. The smaller container size is also perfect to blend drinks fit for one or two people, nothing goes to waste. The smaller size also comes with a smaller price tag compared to some of the other models with a price point of CAD$400 which is what people have been asking Vitamix to come out with for a very long time. They listened!

If you're finally in the market to upgrade your smoothie game and want to get a great quality blender, but at a manageable price-point, the Vitamix Explorian Series E310 is then perfect fo r you! Here are some great features of the new Vitamix Explorian Series E310 that you'll love!

Variable Speed Control

Ten variable speeds allows you to refine every texture with culinary precision from the chunkiest salsas to the smoothest purees

Pulse Feature

Layer coarse chops over smooth purees for heartier recipes or thick vegetable soups

High-Performance Motor

The powerful 2HP motor can handle the toughest ingredients to create high-quality blends

Easy Cleaning

With just one drop of dish soap and warm water, the Vitamix E310 can clean itself in 30 to 60 seconds -  no disassembly required.

With all these great features I was able to put it all to the test at home by re-creating the exact same recipe that Chef Craig Wong made for us during the series launch at his restaurant. The "Chilled Green Pea Soup" was among one of the favourite dishes of the night and surprisingly so easy to make with the Vitamix E310 at home. You literally just need to throw in all the ingredients in the Vitamix and let it blend! All the work is done by that powerful motor and spinning blades. Before you know it a vibrant and healthy appetizer is ready to be served for a serving of 4 people. Enjoy!

Chilled Green Pea Soup

Ingredients

5 cups frozen peas
4 cups cold chicken or vegetable stock
1/4 cup mint leaves
1/4 cup baby spinach leaves, blanced, shocked in ice, squeezed of excess moisture
1 tbsp salt
1/2 tbsp ground white pepper
1/2 cup heavy cream

Directions

Add frozen peas & stock into Vitamix
Blend on high for 3 to 5 minutes until mixture is very smooth
Add mint, spinach, salt & white pepper. Blend for another 30 seconds
Add heavy cream and blend for 10 seconds
Strain the soup and refrigerate or serve chilled immediately

Summer Fresh Holiday Entertaining

Can you all believe it!? Christmas is here in just under two weeks and probably like most of us it's going to be one of the busiest two weeks of the year. Juggling with last minute Christmas shopping and holiday gatherings, the lead up to Christmas day can be an exhausting one especially if you plan on hosting a holiday meal with your family and friends. Lets face it, often times you end up spending hours on end in the kitchen pumping out dishes for your guests, but this year I am here to show you that holiday entertaining does not have to be time consuming if you have the right recipes in mind. This year by using Summer Fresh products you will be able to make some delicious holiday appetizers that can all be prepared in under 10 minutes and will satisfy your guests with every bite! 

If you are not familiar with Summer Fresh, catch up by reading my older articles here and here! But to give you all a quick refresher, Summer Fresh is a Canadian success story that has found a way into many of our lives at home through their line of salads, hummus, and dips. Made from clean ingredients with no added preservatives, Summer Fresh makes it easy for you to enjoy mealtimes with your loved ones without spending hours on end in the kitchen.

For this holiday season I've teamed up with Summer Fresh to create two brand new appetizer recipes for you all that are outrageously delicious yet takes only ten minutes to make! If you're in need of a new recipe idea to impress your guests at your upcoming holiday party, take a look below to learn how to make my "Honey Glazed Bruschetta" and my "Hummus and Cucumber Pita Bites." They are both to die for! 

Hummus and Cucumber Pita Bites

IMG_7543 (1)-01.jpeg

Recipe

1) Toast the pita bread in the oven and cut it into 6 to 8 slices
2) Spread a layer of Summer Fresh Roasted Garlic Hummus on each wedge
3) Cut your cucumber into thin slices and place two of them on top of the hummus on each wedge
4) Sprinkle with paprika
5) Dab a small spoonful of Summer Fresh Artichoke & Asiago Dip
6) Garnish with dill weed

IMG_7539-01.jpeg

Honey Glazed Bruschetta

IMG_7517-01.jpeg

Recipe

1) Use your favourite cracker/toast as the base
2) Spread a layer of Summer Fresh Traditional Brushchetta on each cracker/toast
3) Crumple a pinch of feta cheese on top
4) Top it off with one ball of Bocconcini
5) Drizzle everything with honey
6) Garnish with a leaf of parsley

IMG_7533 (1)-01.jpeg

For even more great holiday entertaining tips and inspiration, Summer Fresh has put together some fantastic food pairing ideas and created nine more unique and mouth-watering appetizer recipes for you to try this festive season. Pick up their free Summer Fresh APPYS Entertaining Guide in the refrigerated deli section at your local grocery store. A couple of my favourite recipes from them this year include their "Hummus & Baba Ghanouj Toasted Sweet Potato Rounds" and "Artichoke Asiago Spinach Stuffed Mushroom Caps." 

IMG_0175.JPG
IMG_0193.JPG

Masterchef Canada Mary Berg's Original Churro Recipe

If you recently finished marathoning a Netflix show like me and is in dire need to find a new show to watch, I have a mighty good suggestion right here for you! Around a month ago I was on set of Masterchef Canada's Season 3 Winner Mary Berg's brand new cooking show, "Mary's Big Kitchen Party" and saw her whip up some delicious things! Premiering last month already in October, we all get to see Canada's favourite home cook make some of her best dishes for an entourage of some of her closest friends. If you haven't read my full experience of my visit on set and my one-on-one interview with her yet, you can play catch up by clicking HERE.

MB [1].JPG

Rolling out over 8 weeks on Bell Fibe TV1 and Gusto TV, Mary's Big Kitchen Party will see her create original recipes with unique ingredients in an effort to bring people together in her favourite room of the house - the kitchen! From seared scallops with crispy pancetta and poke crisps to peach pecan cake with burnt caramel and gingerbread whoopee pies with eggnog cream, each week will give viewers something new to try, allowing them to bring the party home.

When I was on set and watched the TV filming magic happen before me, I was able to witness Mary make these most delicious looking churros for her guests to eat. It was hard not to hear my stomach grumble as I watched from far away the entire cooking process of making this fried treat come to life. After filming was done I was able to grab one to eat and in my honest opinion, best churro I have EVER had! It was mindblowingly good and because it was just that tasty I made sure that I was able to share this amazing recipe to all my loyal readers!

Enjoy and don't forget to tune in every Friday at 9PM on Gusto TV and OnDemand on Fibe TV, Channel 1 to catch Mary make even some more mouth-watering recipes!

Mary Berg's Original Churro Recipe

MBKP Churros [3].JPG

Serves 8

Ingredients

1 cup water
½ teaspoon salt
2 tablespoons sugar
1 ½ tablespoon unsalted butter
1 ½ teaspoon vanilla
1 cup all purpose flour
Vegetable oil, for frying
½ cup sugar
2 teaspoons cinnamon
Store bought chocolate sauce

Directions

In a small saucepan over medium heat, combine the water, salt, sugar, and butter.  Bring this mixture to a boil, add the vanilla, and dump in the flour all at once.  Stir the mixture with a wooden spoon until it forms a ball.  Remove from the heat and continue to stir for about 30 seconds.

Allow the mixture to cool and heat 3 – 4” of vegetable oil in a large, heavy bottomed pot to 375F.  Mix the sugar and cinnamon in a bowl and set aside.

Spoon the slightly cooled churro mixture into a piping bag fitted with a star tip and pipe a few churros at a time into the hot oil by piping and snipping with scissors.  Fry the churros until golden and drain on a paper towel lined plate.

While still hot, place the churros in the cinnamon sugar and toss to coat.  Allow them to cool slightly and serve warm with store bought chocolate sauce.

The Perfect Cocktail For Any Party

When it comes to entertaining often times the hardest part of putting a party together is trying to figure out what drinks you'll be serving to all your guests. Of course you can go the easy route and have a selection of store bought juices, pop, and beers on hand, but that's not the type of party you want to have. That's not the host you want to be! You want to provide your guests with choices. You want to elevate your party with home-made cocktails that get the alcohol flowing and people talking. Something that can be put together in a jiffy without leaving you stuck in the kitchen for hours on end. By the time you get through reading this article, you'll have at least one more party trick up your sleeve and let me tell ya. This is a good one!

A simple solution to spice up your next party that will surely be a hit among all your guests is by offering up the Mexican soda, Jarritos. Introduced in 1950 as Mexico's first national soft drink, this drink has stood the test of time and is still enjoyed by millions of people around the world. Made with 100% natural sugar, many of their 12 delicious flavours here in Canada are sourced from actual fruit trees in Mexico. You can drink them straight up out of their distinctive glass bottles or turn them into colourful cocktails for a new and exciting way to make some boozy drinks.

007_JarritosLaCarnita.jpg

A few weeks ago Jarritos helped celebrate "Dia de los Muertos" aka Day of the Dead or All Souls Day in Toronto, where they hosted a media dinner at one of the city's finest Mexican restaurant La Carnita. We had the most epic Mexican feast the night after Halloween which consisted of Dips & Chips (the fresh guacamole was amazing), chicken wings, Mexican street corn, tacos, and paletas. One of the highlights of this feast was definitely the Jarritos cocktail that started the night off for me, and ended the night as well. I just couldn't stop drinking it and lucky for us here I have the recipe to re-create it back at home!

The "Strawberry For The Souls Cocktail" was created by Joanna Matysiak of La Carnita and incorporates the strawberry flavour of Jarritos in it. This is the perfect cocktail to incorporate at your next party because it's so easy to make and it just tastes absolutely delicious and refreshing with the aromatic strawberry flavour it brings.

Strawberry For The Souls Cocktail Recipe

Ingredients:

2oz Tequila
1oz Lemon Juice
3oz Coconut Water
3oz Strawberry Jarritos
Strawberry Slices (garnish)
Dehydrated Lemon Wheel (garnish)

Directions:

Combine tequila, lemon juice, and coconut water in a shaker and shake away. Strain contents into a mason jar (or glass) over fresh ice. Top up with strawberry Jarritos, garnish, and enjoy!

All pictures on this blog post taken by Josh Tenn-Yuk courtesy of Jarritos Canada

All pictures on this blog post taken by Josh Tenn-Yuk courtesy of Jarritos Canada

If you want to switch it up a bit, or add some more variety of flavours into the mix just replace the Strawberry Jarritos in the end and try some other fruit flavours such as Pineapple, Mango, or Grapefruit (all personally my other favourite fruit flavours from Jarritos). Half of the fun is getting to experiment with all the colourful and fruity flavours Jarritos offer!

Creating a Viking Appetite with Highland Park

Did you ever wonder if you had any Viking ancestry in you? Well if you just so happen to be living and reading this from Orkney, Scotland you very likely could be part Viking! In fact 1 in 3 people living on Orkney today have Viking ancestry, and the Highland Park 12 Years Old Viking Honour Single Malt Scotch Whisky perfectly reflects the unique culture of the remote island home.

Highland Park is a premium and unique singe malt Scotch Whisky that honours the spirit of the Viking ancestors. It shares the pride, integrity and fierce independence of the Vikings and is distilled with the same rigorous standards introduced in 1798 by the founder, Magnus Eunson who was a descendant of the early Viking settlers.

IMG_9277-01.jpeg

There are five keystones that separate Highland Park from other distilleries: hand turned floor malting, aromatic peat from Hobbister Moor, sherry oak casks, cool maturation, and cask harmonization. No other distillery uses all 5 of these benchmarks, so it's safe to say there is no other whisky out there that tastes like Highland Park.

Viking Honour features the perfect harmony of aromatic smoky peat, sweet heather honey, and rich fruit cake. The full Highland Park 12 Years Old Viking Honour Tasting Notes (43% abv/750 mL) are below:

Colour: Natural, glowing amber
Nose: Heather-honey sweetness, gently peaty smokiness
Palate: Rounded smoke and honey sweetness, full malt delivery, oak, alongside equal amounts of dried fruits and spice
Finish: Sweet and lingering with heathery notes and subtle smoke right at the end

With a recent update to its aesthetics (box & bottle design) and name, Highland Park has teamed up with The Healthy Butcher, a local Greater Toronto Area butcher, to create some unique infusion and pairing recipes that will no doubt stir up our Viking Appetites. The Healthy Butcher is focused on craftsmanship, providing only the best quality 100% grass fed and Certified Organic meat to their consumers. This partnership brings the smokey and sweet notes from the Highland Park Whisky to rustic and or gamey meats from The Healthy Butcher, so today I am going to share with you all a delicious Meatball recipe that will surely be the show stopper at your next family meal.

These meatballs can be eaten two ways. You can incorporate them in any classic pasta dish or better yet pair it off with the Highland Park Scotch Whisky Sauce (the recommended way of eating it)!

IMG_9296-01.jpeg
IMG_9305-01.jpeg

Below you will find all the ingredients you need for the Meatballs and Highland Park Scotch Whisky Sauce. Simply combine all the ingredients together.

Meatballs

  • 2 1/2 ounces breadcrumbs

  • 2 pounds ground beef

  • 1 1/2 pounds ground pork

  • 1 large egg

  • 1 1/2 tbsp salt

  • 2/3 tbsp pepper

  • 1/4 tsp cayenne pepper

  • 1/2 tbsp coriander

  • parsley

  • 1/2 diced onion

Highland Park Scotch Whisky Sauce

  • 1 diced onion

  • 1/4 cup Highland Park Scotch Whisky

  • 1/2 cup beef broth

  • salt to taste

  • pepper to taste

  • 1 oz roux (butter/flour)

  • 2 sprigs rosemary

  • 2 cloves garlic

IMG_9312-01.jpeg

There are also select products that are already infused with the Highland Park Single Malt Scotch Whisky that can be bought at any of The Healthy Butcher store locations in Toronto and Kitchener. So the next time you want to fire up your grill or have some mad cravings for some delicious meats, don't forget to bring out the Viking in you and pair it off with some Highland Park, The Orkney single malt with a Viking soul!

Summer Fresh Perfect Pairings - Grilled Portobello with Pesto Chicken Topped with Bruschetta & Italian Sausage Stuffed Peppers Topped with an Artichoke Dip

Summer is slowly fleeting away as another month has come and gone. It seemed just like yesterday where we shared our Canada Day long weekend recipes featuring some of our favourite Summer Fresh dips and salads that could easily be grilled and assembled with less than 10 minutes to prep. In case you need a refresher the Canada 150 celebrations were kicked off with our Greek Burger topped with Tzatziki Feta & Cucumber sauce, and also a Roasted Red Pepper BBQ Pizza on Naan. If you haven't tried these recipes it's not too late to do so!

With another long weekend looming just around the corner, we've developed two new recipes perfect for another summer barbecue for this Civic long weekend using more of our favourite Summer Fresh products. They craft healthy, preservative-free gourmet salads, hummus, and dips using real and simple ingredients you can find in your own kitchen. They are a Canadian based, family run company with a manufacturing facility based in Woodbridge, Ontario. It's there where all the magic happens to package their products in their iconic containers with the bright green lids you'll find in your local grocery store.

Below you will find two of our original recipes that are easy to prepare, fun to grill, and even sweeter to eat. Both of these recipes can be deliciously paired off with the Summer Fresh Greek Couscous Salad.

Grilled Portobello with Pesto Chicken Topped with Bruschetta

Recipe:

1) Marinate some chicken breast and place it on the grill
2) Grill the portobello mushrooms whole on the grill
3) Once chicken breast is fully cooked, cut into small pieces and mix in 1/3 cup of prepared pesto
4) Place the pesto chicken on top of the portobello mushrooms, sprinkle Mozzarella cheese on top, and grill again for 2 more minutes or until cheese has melted
5) Top it off with Summer Fresh Brushetta


Italian Sausage Stuffed Peppers Topped with an Artichoke Dip

Recipe:

1) Place some Italian sausage on the grill
2) Cut the peppers in halves, take out the seeds, and place it on the grill
3) Chop up the grilled Italian sausage in cubes and stuff it inside the grilled peppers
4) Sprinkle Mozzarella cheese on top, and grill again for 2 more minutes or until cheese has melted
5) Top it off with Summer Fresh Artichoke & Asiago Dip

For even more recipe ideas with Summer Fresh, visit HERE to check out Summer Fresh's current Perfect Pairings guide to get even more grilling inspiration. This is real food you can feel good about everyday. Let us know how you like these recipes by sounding off below. Have a great long weekend everyone!

Summer Fresh Perfect Pairings - Greek Burger & BBQ Pizza on Naan Recipe

The official day of summer has come and gone which means it's time to fire up the grill for barbecue season! Summer is meant for backyard get-togethers, cold drinks, and great food with family and friends, so we have partnered this year with Summer Fresh to bring you some simple recipes that you can simply grill, assemble, and enjoy! It's summer entertaining made easy that will allow you to spend less time cooking and more time spending it with your guests.

If you have stepped inside a grocery store lately you may have seen the many products from Summer Fresh on the shelves in their iconic green lids specializing in gourmet salads, hummus, and dips. Their Canadian story started over 25 years ago in a family kitchen where recipes were developed using real ingredients that can be found in anyone's kitchen. These products are always used with clean ingredients, with no added preservatives, and made with a belief of super fresh quality and uncompromising flavours.

I've created two simple recipes here showcasing some of my favourite products from Summer Fresh, perfect for that summer barbecue this weekend to celebrate Canada Day and our nation's 150th birthday! With less than 10 minutes to prep, these recipes are delicious and a breeze to make.

Greek Burger topped with a Tzatziki Feta & Cucumber Sauce

Recipe:

1) Cut up your favourite hamburger toppings such as lettuce, onions, and tomatoes
2) Mix together Summer Fresh Tzatziki, Greek yogurt, feta cheese, dill, and chopped cucumbers
3) Grill your hamburger patties on your barbecue. Optional: If you're making your own patties from scratch, you can also mix in some crumbled feta with the meat
4) Half way when grilling your hamburger patty, place a layer of Provolone cheese and let it melt
5) Assemble your hamburger and top it off with the Tzatziki Feta & Cucumber sauce
6) Pair it off with a Summer Fresh Greek Pasta Feta Salad

IMG_6399-01.jpeg

Roasted Red Pepper BBQ Pizza on Naan

Recipe:

1) Spread Summer Fresh Roasted Red Pepper Hummus on naan
2) Cover with Provolone cheese and sprinkle with shredded Mozzarella
3) Cut up cherry tomatoes in halves and place on top
4) Grill for 5-7 minutes
5) Top it off with prosciutto, arugula and/or spinach
6) Pair it off with a Summer Fresh Pad Thai Salad

If you need even more ideas for your Summer barbecue, check out Summer Fresh's current Perfect Pairings guide to give you some more recipes and inspiration by clicking HERE.

Would love to hear If you end up trying either of these two recipes at your next barbecue! As always feel free to leave your thoughts and comments below, and even how you personalized these recipes to fit your own barbecue style.  Keep checking back here next month as I will be creating some more recipes for you all with some new Summer Fresh products for the next long weekend in August.

Natrel's New Lactose-Free/Organic Butter - Date Squares Recipe

An undisputed dairy market leader across several categories, Natrel is continuing to innovate with the launch of Canada's first lactose-free butter in addition to an organic butter. This is an absolute must for anyone who loves authentic taste as nothing beats the flavour of real butter. I'm sorry margarine, I'm looking at you.

With a passion for authenticity, this is exactly why Natrel is launching two new butters which are both available in a 250g format aimed to please lactose-intolerant consumers as well as the ever-growing organic food category. That friend or family member that you know who is 1 of 7 million lactose intolerant Canadians can now find satisfaction that there is no need anymore to avoid their favourite baked desserts, or that buttery casserole on the dinner table that everyone else was able to enjoy except them. 

To discover the joys of cooking with Natrel's new organic and lactose-free butters, we are going to share a delicious dessert the whole family can enjoy and make together. These Date Squares perfectly showcase the creamy texture and rich taste of Natrel's newest butter with a delicious filling enclosed by light, golden layers.

Date Squares

Serves: 16 Squares
Preparation: 10 minutes
Cooking: 50 minutes

Ingredients

For the date filling

4 cups pitted dried dates
1 cup (250 ml) water
1 tsp (5ml) vanilla

For the crust and crumble

1 1/8 cups cold Natrel Organic or Lactose-Free Butter, cubed
2 1/2 cup oats
1 cup light brown sugar
1 1/2 cups all-purpose flour
1/4 tsp ground cinnamon

Directions

To prepare the date filling

1) In a medium saucepan, heat the dates and water on low to slowly soften the dates.
2) Cook the mixture for about 10 to 15 minutes, stirring every so often. The dates will absorb all the water and form a chunky, soft paste. Let cool.
3) Transfer the date paste to a food processor. Add the vanilla and then process the mixture into a smooth paste. Transfer to a bowl and set aside.

To prepare the crust and crumble

4) Preheat the oven to 350F (180C). Butter a 9" x 9" brownie pan and then line the bottom with a square of parchment paper. Set aside.
5) In the bowl of a food processor, pulse together the oats, light brown sugar, flour and cinnamon. Drop in the cold butter and pulse to form a crumble.
6) Take two-thirds of the mixture (roughly 1/3 lb or 600 grams) and press it evenly into the bottom of the prepared pan with your hands or a flat-bottomed glass baking dish to create a very firm base.
7) Smooth the date filling over top, from edge to edge. Evenly sprinkle the last third of the crumble mixture on top of the date filling. Press it gently into the date layer.
8) Bake the date squares for about 40 minutes, until the edges are golden brown. Let the squares cool completely in the pan. Cover the pan with plastic wrap and chill overnight in the refrigerator. Once thoroughly chilled, cut into 16 squares to serve.

Milk Calendar's 40th Anniversary - Eggs Benedict With A Twist Recipe

Holy cow! I just had to do it.

Dairy Farmers of Canada's Milk Calendar which has been an integral part of many Canadian families from coast to coast is celebrating their 40-year milestone with their 2017 edition. Like many of us, every year we eagerly wait for the new Milk Calendar to hang up on our walls, providing us with easy, innovative, and delicious dairy related recipes for every meal and occasion.

The majority of Canadians do not consume the recommended servings of milk and dairy products, so the Milk Calendar was created 40 years ago to help Canadian families get their recommended daily servings using 100% Canadian milk in its recipes. This year of course is no exception and the 2017 edition reflects the milestone with a "How Far We've Come" theme that is also intended to honour Canada's 150th anniversary in 2017.

As soon as you turn to the first page of the 2017 Milk Calendar, you'll notice they've included some of their favourite recipes from their four decade old collection such as the Piquant Potato Salad from 1974, the Beef Ring with Seasonal Vegetables from 1981, and the Apple Berry Cobbler from 2000. All of these nostalgic recipes have been updated with flavours and ingredients using the current culinary tastes that anyone will come to love and enjoy in today's times.

Breakfast/brunch is absolutely my most favourite meal of the day so it is quite fitting that I will be sharing with you all the December 2017 Milk Calendar recipe, Eggs Benedict With A Twist. Fast forward a year from now, many Canadian families will be serving this up for the whole family to enjoy during the Holiday season. But for now you all get a sneak peak into this take on eggs benedict that includes the fresh and creamy taste of avocado.

Eggs Benedict With A Twist

Prep Time: 10 Minutes
Cook: 3 Minutes
4 Servings

Ingredients

2 tsp (10 mL) butter
4 tsp (20mL) all-purpose flour
1 cup (250mL) milk
1/2 cup (125mL) finely grated Canadian Parmesan
1/2 tsp (2mL) mustard power
1/4 tsp (1mL) each, hot sauce and salt
4 small slices olive, cheese, or crusty Italian bread
4 eggs
4 thin slices Black Forest ham
4 slices tomato
1 avocado, peeled, and thinly sliced
Chives for garnish (optional)

Directions

1) Melt butter in a small saucepan. Whisk in flour. Gradually whisk in milk. Stirring continuously, bring to a boil. Reduce heat and simmer gently 1 min. Whisk in Parmesan, mustard powder, hot sauce, and salt. Remove from heat; sauce will thicken slightly while preparing remaining ingredients. 2) Toast bread. 3) Poach eggs in simmering water about 3 mins. Fold ham to fit on each slice of bread, followed by a slice of tomato, avocado slices then egg. Drizzle with sauce then sprinkle with chives if using.

Cooking Tip

Add about 1 tbsp (15mL) white vinegar to eggs' poaching water; this helps eggs to hold their shape. Gently pat eggs dry with paper towel after cooking to prevent bread from becoming soggy.

Variation

Try fried eggs instead of poached and prosciutto instead of ham. 

Per Serving

Energy: 344 Calories, Protein: 19 g, Carbohydrate: 21 g, Fat: 21 g, Fibre: 4.6 g, Sodium: 694 mg, Calcium: 267 mg

All Milk Calendar recipes since 1974 are also available online at MilkCalendar.ca. Visit MilkCalendar.ca to see how you can pick up your copy of the 2017 calendar!